29.06.2020
Lm317 serial connection diagram. Using the LM317 voltage regulator. Powerful analogs of LM317T - LM350 and LM338
If you decide to convert your car to LED lighting, you will need at least an lm317 current stabilizer for LEDs. Assembling a basic stabilizer is not at all difficult, but in order to avoid disastrous mistakes even with such a simple task, a minimal educational program will not hurt. Many people not involved in radio electronics often confuse concepts such as current stabilizer and voltage stabilizer.
Easy about simple things. Current strength, voltage and their stabilization
Voltage determines how quickly electrons move through a conductor. Many passionate fans of hard computer overclocking increase the voltage of the central processor core, making it start to function faster.
Current strength is the density of electron movement within an electrical conductor. This parameter is extremely important for radioelements operating on the principle of thermionic secondary emission, in particular, light sources. If the cross-sectional area of the conductor is not able to pass the flow of electrons, excess current begins to be released in the form of heat, causing significant overheating of the part.
To better understand the process, let’s analyze the plasma arc (electric ignition works on its basis gas stoves and boilers). At very high voltage the speed of free electrons is so high that they can easily “fly” the distance between the electrodes, forming a plasma bridge.

And this is an electric heater. When electrons pass through it, they transfer their energy to the heating element. The higher the current, the denser the flow of electrons, the more the thermoelement heats up.
Why is current and voltage stabilization necessary?
Any radio-electronic component, be it a light bulb or a computer's central processor, requires for optimal operation a clearly limited number of electrons that flow through the conductors.
Since our article is about a stabilizer for LEDs, we’ll talk about them.
With all their advantages, LEDs have one drawback - high sensitivity to power parameters. Even moderate excess of force and voltage can lead to burnout of the light-emitting material and failure of the diode.
Nowadays it is very fashionable to remodel a car's lighting system for LED lighting. Their color temperature is much closer to natural light than that of xenon and incandescent lamps, which makes the driver much less tired on long trips.
However, this solution requires a special technical approach. The rated supply current of a car LED diode is 0.1-0.15 mA, and the starting battery current is hundreds of amperes. This is enough to burn out a lot of expensive lighting elements. To avoid this, use a 12 volt stabilizer for LEDs in cars.
The amperage in a vehicle network is constantly changing. For example, a car air conditioner “eats” up to 30 amperes; when it is turned off, the electrons “allocated” to its operation will no longer return back to the generator and battery, but will be redistributed among other electrical appliances. If an additional 300 mA does not play a role in an incandescent lamp rated at 1-3 A, then several such surges can be fatal for a diode with a supply current of 150 mA.
To guarantee long-term operation of automotive LEDs, a current stabilizer based on lm317 is used for high-power LEDs.
Types of stabilizers
According to the method of limiting the current, there are two types of devices:
- Linear;
- Pulse.

It works on the principle of a voltage divider. It releases a current of a given parameter, dissipating the excess in the form of heat. The operating principle of such a device can be compared to a watering can equipped with an additional drain hole.
Advantages
- affordable price;
- simple installation diagram;
- easy to assemble with your own hands.
Disadvantage: due to heating, it is poorly suited to work with heavy loads.
Like a vegetable cutter, it cuts the incoming current through a special cascade, giving out a strictly dosed amount.

Advantages
- designed for high loads;
- does not heat up during operation.
Flaws
- requires a power source for its own operation;
- creates electromagnetic radiation;
- relatively high price;
- Difficult to make yourself.
Considering the low current in car LEDs, you can assemble a simple stabilizer for LEDs with your own hands. The most accessible and simple driver LED lamps and the tapes are assembled on the lm317 chip.
Brief description of lm317
The LM317 radio-electronic module is a microcircuit used in current and voltage stabilization systems.
- The voltage stabilization range from 1.7 to 37 V will ensure stable LED brightness, independent of engine speed;
- Support for output current up to 1.5 A allows you to connect several photo emitters;
- High stability allows fluctuations in output parameters of only 0.1% of the nominal value;
- Has built-in current limiting protection and a shutdown cascade for overheating;
- The microcircuit body is ground, so when fastened with a self-tapping screw to the car body, the number of mounting wires is reduced.
Application area
- Voltage and current stabilizer for LEDs in domestic conditions (including for LED strips);
- Voltage and current stabilizer for LEDs in cars;
Current stabilizer circuits for LEDs
 Circuit of the simplest stabilizer
 The simplest 12 volt voltage stabilizer can be assembled using this circuit. Resistor R1 limits the output current, R2 limits the output voltage. The capacitors used in this circuit reduce voltage ripple and increase operating stability.
The needs of the motorist will be satisfied by the simplest stabilization mechanism, since the supply voltage in the car network is quite stable.
To make a stabilizer for diodes in a car you will need:
- Chip lm317;
- Resistor as a current regulator for LEDs;
- Soldering and installation tools.
We assemble according to the above diagram
Calculation of a resistor for an LED driver
The power and resistance of the resistor are calculated based on the current strength of the power supply and the current required by the LEDs. For car LED with a power of 150 mA, the resistor resistance should be 10-15 Ohms, and the calculated power should be 0.2-0.3 W.
How to assemble it yourself, watch the video:
The availability and simplicity of the driver design on the lm317 chip allows you to painlessly re-equip the system electric lighting any car.
The LM317 adjustable three-terminal positive voltage regulator provides 100 mA load current over an output voltage range of 1.2 to 37 V. The regulator is very easy to use and requires only two external resistors to provide output voltage. In addition, the voltage and load current instability of the LM317 stabilizer is better than that of traditional stabilizers with a fixed output voltage.
Another advantage of the LM317 IC is that it is produced in a standard TO-92 transistor package, convenient for installation and installation. In addition to improved technical and operational performance compared to traditional stabilizers that have a fixed output voltage, the LM317L stabilizer has all (available only for IC) overload protection, including built-in internal current limiting circuits, overheating and safe area correction work.

All stabilizer overload protection functions also operate when the control terminal (ADJ) is disconnected. At normal conditions work, stabilizer LM317. Does not require connecting additional capacitors, except in situations where the stabilizer IC is installed far from the primary power filter capacitor; In such a situation, an input bypass capacitor is required. An alternative output capacitor improves the transient performance of the stabilizer, and shunting the IC control pin with a capacitor increases the voltage ripple smoothing factor, which is difficult to achieve in other known three-terminal stabilizers.
In addition to replacing traditional fixed-voltage regulators, the LM317 is convenient for operation over a wide range of possible options applications. So, in particular, the mode of operation of the stabilizer that “floats” based on the actual output voltage drop, in which the IC is affected only by the difference between the input and output voltage, allows it to be used in circuits with high-voltage stabilized power supply, and the operation of the stabilizer in such a circuit can continue indefinitely , until the difference between the input and output voltage exceeds the maximum permissible value.
In addition, the LM317 is convenient for creating very simple adjustable switching regulators, stabilizers with a programmable output, or for creating a precision current stabilizer based on the LM317 by connecting a constant resistor between the control and output pins of the IC. Creation of secondary power sources that remain operational during occasional short circuits output circuits, perhaps due to fixing the voltage level on the control pin of the IC relative to ground, which programs the output voltage to be kept at 1.2 V (for this voltage level, the current is quite small for the vast majority of types of loads). The LM317 IC is produced in a standard TO-92 transistor package, and operates in a temperature range of -25 +125 "C.
The charger diagram for the LM317 is shown below. It uses a charging method DC. The charge current depends on the resistance R1. The resistance value should be in the range from 0.8 Ohm to 120 Ohm, which is equal to the charging current from 10 mA to 1.56 A:

Stabilized 5 Volt power supply with electronic switching:

15 volt power supply with soft start. The required smoothness of switching is set by the capacitance level of capacitor C2:

Scheme of an adjustable power supply for 2-30 Volts on LM317
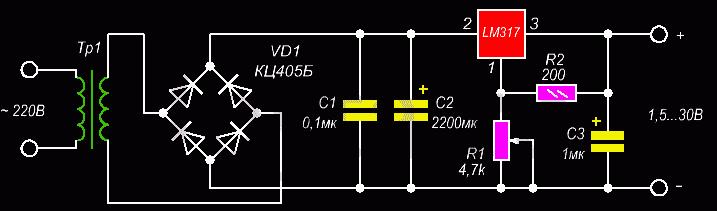
The output voltage can be adjusted from 1.2 to 37 volts.

The powerful Darlington transistor Q1 is necessary to increase the current of the LM317, because without a radiator, the microassembly can output only 100 mA current, but it is quite enough to control the transistor. D1 and D2 are protective diodes against overcharging of capacitors. 100 nF capacitors are installed in parallel with the electrolytic capacitors to reduce RF noise. It is advisable to place transistor Q1 on a radiator, maximum output power PSU - 125 watts.
Programmable power supply on LM317 circuit |
The diagram shown in the figure below allows you to change output voltage by turning transistors on and off. When the transistor is turned on, resistance R will be connected to ground, which affects U out. The maximum circuit voltage is 27 Volts at an input level of 28 V.

2N2222 or their analogues can be used as bipolar transistors T1-T4. The table on the left shows the output voltage of the circuit and its corresponding resistance R when connecting one of contacts A-D with U input.
This circuit limits the current and ensures normal operation of the LED. This driver can power 0.2-5 watt LEDs from 9-25 Volts
With the help of a transformer, we lower the voltage from the 220 Volt variable to 25 Volts (you can use a transformer for another voltage convenient for you), then AC voltage turns into constant using the diode bridge spell and is smoothed out by capacitor C1, then to a highly stable voltage regulator
The device diagram is quite simple. The voltage coming from the secondary windings of the 24 volt transformer is rectified and the output of the filter is constant pressure 80V, which is supplied to voltage stabilizer, with its output produces a constant voltage of 52 Volts, so as not to exceed the maximum threshold voltage on the chip
In this electronic directory, among other useful things, there is a calculation integral stabilizer voltage LM317
A fairly simple automatic type charger can be assembled on the LM317 chip, which is a typical linear voltage regulator with an adjustable output voltage. The microassembly can also act as a current stabilizer.
The adjustable voltage stabilizer LM317 is available in monolithic packages TO-220, TO-220FP, TO-3, D 2 PAK. The microcircuit is designed for an output current of 1.5 A, with an adjustable output voltage in the range from 1.2 to 37 V. The nominal output voltage is selected using a resistive divider.
Key Features of LM317
- Maximum input voltage 40V
- Output voltage range 1.2 to 37V
- Output current 1.5 A
- Load instability 0.1%
- Current limit
- Thermal shutdown
- Operating temperature 0 to 125 o C
- Storage temperature -65 to 150 o C
Analogue LM317
The domestic analogue of LM317 is the KP142EH12A chip.
Pin Configuration

The circuit of the regulated power supply on LM317 will look like this:

Transformer power 40-50 W, secondary winding voltage 20-25 volts. Diode bridge 2-3 A, capacitors 50 volts. C4 – tantalum, if this is not available, you can use a 25 µF electrolyte. Variable resistor R2 allows you to adjust the output voltage from 1.3 volts; the upper limit of the output voltage will depend on the voltage of the secondary winding of the transformer. The input of the LM317 stabilizer should be no more than 40 volts; the maximum output voltage will be 3 volts less than the input. Diodes VD1 and VD2 serve to protect the LM317 in some situations.
If a power supply with a fixed voltage is required, then the variable resistor R2 must be replaced with a constant one, the value of which can be calculated using the LM317 calculator or using the formula from the LM317 datasheet.

You can assemble a current stabilizer on the LM317 chip; the value and power of resistor R1 is calculated using the LM317 calculator. This circuit is used as a power source for high-power LEDs.
Charger for LM317 (circuit from datasheet)

This charger circuit is designed for 6 volt batteries, but by selecting R2 you can set the desired output voltage for other batteries. With a rating of R3 equal to 1 Ohm, the charging current limitation will be at 0.6 A.
If the circuit requires a stabilizer for some non-standard voltage, then an excellent solution is to use the popular integrated stabilizer LM317T with the following characteristics:
- capable of operating in the output voltage range from 1.2 to 37 V;
- output current can reach 1.5 A;
- maximum power dissipation 20 W;
- built-in current limitation for short circuit protection;
- built-in overheating protection.
Description
For the LM317T microcircuit, the minimum connection circuit assumes the presence of two resistors, the resistance values of which determine the output voltage, an input and output capacitor.
The stabilizer has two important parameters: the reference voltage (Vref) and the current flowing from the adjustment pin (Iadj).
The value of the reference voltage can vary from instance to instance from 1.2 to 1.3 V, and on average is 1.25 V. The reference voltage is the voltage that the stabilizer chip strives to maintain across resistor R1. Thus, if resistor R2 is closed, then the output of the circuit will be 1.25 V, and the greater the voltage drop across R2, the greater the output voltage will be. It turns out that 1.25 V on R1 adds up with the drop on R2 and forms the output voltage.

The first time I calculated the divider for the microcircuit using the formula from the LM317T datasheet, I was given a current of 1 mA, and then for a very long time I wondered why the voltage and real voltage were different. And since then I have been asking R1 and counting according to the formula:
R2=R1*((Uout/Uop)-1).
I test in real conditions and clarify the values of resistances R1 and R2.
Let's see what they should be for the widespread voltages of 5 and 12 V.
But I would advise using the LM317T in the case of typical voltages, only when you urgently need to do something on your knee, and a more suitable microcircuit like 7805 or 7812 is not at hand.
And here is the pinout location of the LM317T:
- Adjusting
- Day off
- Input
By the way, the domestic analogue of LM317 - KR142EN12A - has exactly the same connection circuit.

It's easy to do on this chip adjustable block power supply: instead of constant R2, put an alternating one, add a network transformer and a diode bridge.

You can also make a circuit on LM317 soft start: add a capacitor and a current amplifier on a bipolar PNP transistor.

The connection circuit for digital control of the output voltage is also not complicated. We calculate R2 for the maximum required voltage and add chains of a resistor and transistor in parallel. Turning on the transistor will add, in parallel to the conductivity of the main resistor, the conductivity of the additional one. And the output voltage will decrease.

The current stabilizer circuit is even simpler than the voltage stabilizer, since only one resistor is needed. Iout = Uop/R1.
For example, in this way we get a current stabilizer for LEDs from lm317t:
- for single-watt LEDs I = 350 mA, R1 = 3.6 Ohm, power of at least 0.5 W.
- for three-watt LEDs I = 1 A, R1 = 1.2 Ohm, power of at least 1.2 W.

Easy to make using stabilizer Charger for 12 V batteries, this is what the datasheet offers us. Rs can be used to set the current limit, while R1 and R2 determine the voltage limit.

If the circuit needs to stabilize voltages at currents of more than 1.5 A, then you can still use the LM317T, but in conjunction with a powerful bipolar transistor of the pnp structure.
If we need to build a bipolar adjustable voltage stabilizer, then an analogue of the LM317T will help us, but working in the negative arm of the stabilizer - LM337T.

But this chip also has limitations. It is not a low-dropout regulator; on the contrary, it only starts to work well when the difference between the output and output voltage exceeds 7 V.
If the current does not exceed 100mA, then it is better to use low-dropout ICs LP2950 and LP2951.
Powerful analogs of LM317T - LM350 and LM338
If the output current of 1.5 A is not enough, then you can use:
- LM350AT, LM350T - 3 A and 25 W (TO-220 package)
- LM350K - 3 A and 30 W (TO-3 package)
- LM338T, LM338K - 5 A
The manufacturers of these stabilizers, in addition to increasing the output current, promise a reduced control input current to 50 μA and improved accuracy of the reference voltage.
But the switching circuits are suitable for LM317.
LM317 - This is a very common, versatile and convenient integrated voltage regulator that can be used in a variety of designs and assemblies. You can even assemble a very simple one using this microcircuit. In addition to voltage regulation LM317 can be used as a current regulator. One example is the brightness control of a line of LEDs. The microcircuit can be used in a power source with a fixed output voltage, or used as a basis with the ability to adjust the output voltage over a wide range. It is especially convenient to use LM317 when you need to make a stabilized power supply for any non-standard voltage or a regulated power source.
Features of LM317
- The microcircuit can operate in a wide range of output voltages from 1.2 to 37 V.
- The microcircuit provides an output current of up to 1.5 A.
- Maximum power dissipation up to 20 W.
- The microcircuit has built-in protection against overcurrent and short circuit.
- Built-in overheat protection.
Minimum turn-on involves the use of two external resistors. The ratio of the resistances of these resistors sets the output voltage of the regulator and the two capacitors at the input and output of the microcircuit.
The most important electrical parameters of the microcircuit are the reference voltage Vref and that in the control output circuit Iadj. The reference voltage is the voltage that the microcircuit strives to maintain across resistor R1, that is, if we short-circuit resistor R2, then at the output of the regulator we will receive this same reference voltage. This voltage may vary slightly from instance to instance and is 1.2 ... 1.3 V (on average 1.25V.) The higher the voltage drop across resistor R2, the higher the output voltage of the regulator. The output voltage is easy to calculate; it is equal to the voltage drop across R2 + 1.25 (Vref).

R2=R1*((Uout/Uop)-1)
Then clarify the values in real conditions in a working circuit.
Here is an example of ratings for a pair of standard voltages:
For 5V voltage R1 = 120 Ohm, R2 = 360 Ohm
For 12V voltage R1 = 240 Ohm, R2 = 2000 Ohm
However, for typical voltages like 5, 12, 15, etc. volts it is easier and more convenient to use fixed voltage regulators like 7805 or 7812. It is better to use 317 for these purposes only if a fixed voltage regulator is not at hand, and you need to make a power source urgently.

Pin configuration of the LM317 chip in different packages


Soft start power supply. As you can see, it adds to the standard scheme bipolar transistor PNP structures, 50 kOhm resistor, silicon diode and 25 µF electrolytic capacitor. When such a source is turned on, there is a minimum voltage at its output, which smoothly increases to the set 15V as capacitor C1 charges.
It is also easy to make a source with several fixed voltages on this chip, which can be switched programmatically using a microcontroller. To do this, we include chains of transistors and resistors in the control circuit, as shown in the figure below. We connect the transistor bases to the microcontroller ports. When submitting high level For each subsequent transistor, he will connect another additional resistor in parallel with R2 and the output voltage will decrease:


Using the LM317 you can make a simple charger for batteries with a nominal voltage of 12V. The values of resistors R1 and R2 set the final voltage on the battery being charged, and resistor Rs sets the maximum charging current. This is a diagram from the datasheet for the microcircuit.

