16.06.2019
Strawberry tree burl, what do they do with it. Growth on a birch: what is it called, why does it appear on the tree? What causes a growth on a birch tree?
Burl on a tree - ash
The ancient Slavic word “kap” means “head”: usually the growth actually has a rounded shape. Other Old Russian names: bolona, howl, vyplavok, swim, float, howl, paport, roll, goiter, svil, brush. In some sources, burls are also called “witch’s broom” or “whirlwind’s nest,” which is not entirely correct, since these names denote a completely different tree pathology.
Burl forms on all deciduous (mostly) and coniferous trees. In Russian latitudes it can be found on birch, poplar, maple, linden, aspen, oak, ash, elm, and walnut.
The dimensions of the burl vary from several centimeters to several meters in cross-section. It takes decades, or even more than half a century, to form a medium-sized growth.
Cap - enough a rare event, and finding at least one specimen in the forest is a great success. However, there are trees with several or even many growths. As well as places with a concentration of burl trees.

Burls on a tree - birch
Typically, trays are divided into stem and root.
A trunk burl forms on thick branches or a trunk and can be lateral (develop on one side, most often the south) or circular (grasp a branch or trunk in a ring).
A basal growth - cap root - is formed on the root collar or roots of a tree. In the first case it is above the ground, in the second it is completely hidden and can be detected in the spring by young shoots near the main trunk of the tree, which quickly die.
A tree can have different types of burls at the same time.

If you remove the bark from the burl, then underneath it an uneven, textured surface will be revealed, completely covered with needle-shaped, jagged and pineal-shaped tubercles - these are undeveloped buds.
Around each dormant bud there is already a rudimentary ring structure.
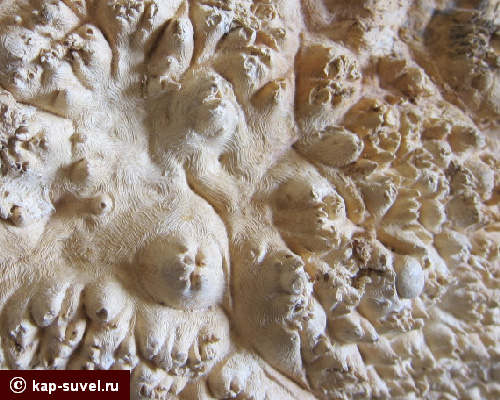
Dormant buds
→ Tree protection - antiseptik.info
Why does a cap appear?
Researchers have not reached a consensus regarding the reasons for the formation of growths.The most natural explanation is that the emerging adventitious bud cannot grow through the thick and hard bark and freezes. However, the growth processes that have begun are accompanied by an influx to this place nutrients and the production of plant hormones, so new buds begin to form nearby, which also become dormant, and so on.
Opponents insist that there is an impact here external factors natural or anthropogenic. In particular, mechanical damage to the cortex (animals, birds, people, extreme elements, etc.) at the site of a dormant bud. This assumption is confirmed by the fact that on plantations walnut, where it is actively used vegetative propagation grafting (which is actually an injury), a root cap often develops on the rootstock below the grafting site. When the fruiting period of the nut expires, the tree is dug up along with the burl, which by that time has grown to a respectable size, and sold as a secondary product.
According to other versions, the formation of a burl can be caused by fungi, bacteria, viruses, insects, weather anomalies (such as sudden spring frosts), changes in ecology and background radiation, special mineral composition soils, geological faults, groundwater.
According to the conclusions of Soviet scientists, the formation of a burl is a biologically useful, protective property for trees, acquired in the process of evolution in response to unfavourable conditions external environment. Moreover, this is a genetically fixed (hereditary) quality. In the Moscow region and Kirov region, successful attempts were made to cultivate trees with growths using planting material from burl birches (seeds and cuttings for scion). It was noted that such trees are more viable and hardy.
The heterogeneous structure of the burl gives a unique, highly decorative pattern in a tangential section: dark dots are the cores of dormant buds, winding areas are elongated and twisted annual layers. In a radial section, light and dark rays are distinguishable.The wide palette of burl colors includes various shades of milky, brown, green, and pink. The color depends on the type of tree, its growing conditions, and the location of the thickening.
The texture of the stem growth is richer than that of the burl, and the burl of valuable and exotic tree species is more expressive compared to ordinary ones.
On a fresh cut, the texture is weakly expressed; to reveal it, the grain is subjected to grinding, toning and polishing. As a result, a picturesque pattern and multicolor appear, a muted shine and shimmer in the light appear.
The burl pattern is often compared to malachite and marble. The comparison with stone is also apt because the growth is characterized by increased density and hardness and is heavier than the parent wood.
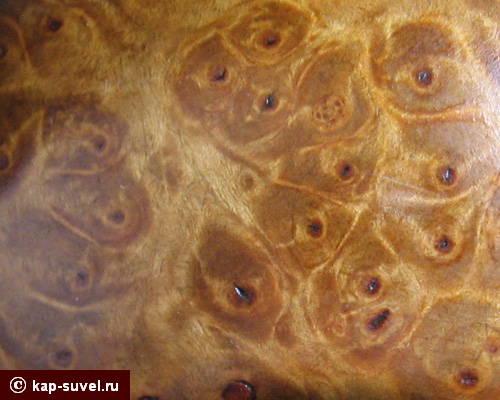
Birch burl texture
Burl is used in its entirety to create artistic products, and in veneer for finishing exclusive items and furniture. Burls of thuja, myrtle, camphor and some other trees retain their characteristic aroma even after processing.
Drying burls and suveli at home. Drying burl and suveli. So first, let's define some concepts. KAP- (aka witch’s broom) is a benign formation on a tree, which is a bunch of thin branches growing from a teardrop-shaped (most often) growth. When viewed cross-section, it has a texture with pronounced knot cores. It is difficult to process due to its highly curled texture and a huge number of knots. Extremely beautiful, durable, perfectly sanded and polished.
Numerous individual areas have a pearlescent tint. It has no great industrial significance, but is highly valued because of its beauty. If it is used in industry, it is only in the form of veneer for finishing furniture (burls from exotic tree species are mainly used), as well as the production of small products such as boxes, cigarette cases, women's hairpins, and small jewelry (birch burls). Use on knife handles is considered good taste, and is also valued by wood carvers for its unique texture.
It is impossible to find two identical pieces of burl; even the halves of a sawn burl have different patterns, the build-up is so heterogeneous. It grows on many trees (linden, alder, birch, maple, oak, etc.), but the most valuable and beautiful is birch (of those growing in our latitudes). The growth is usually small, maximum the size of a volleyball ball or the size of a large plate.
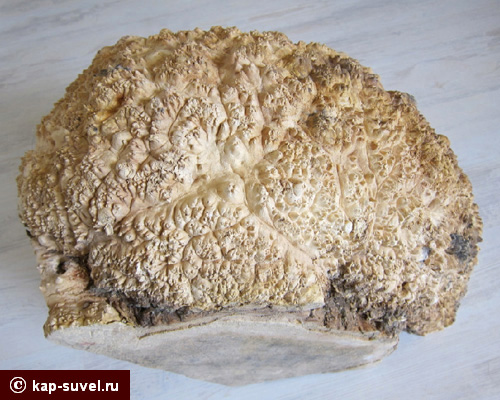
There is no point in cutting any pattern on the burl, since the texture clogs everything up. Look at the photos of what tutati looks like: The photo shows a birch burl. Unfortunately, I couldn’t get a cut of a birch burl (I took these pictures near my native police station and, as you understand, they wouldn’t let me cut anything down there... But I contrived and found an ash burl; most of the burls are similar in texture and only differ color and size of knot cores


SUVEL- (aka svil) As is clear from the name, the growth got its name because of its structure (twisted structure, that’s putting it mildly).
Suvel is a drop-shaped or spherical growth on a tree (there is also a ring variety that covers the tree trunk around the perimeter), usually grows 2-3 times faster than the tree itself. When cut, it has a texture similar in pattern to marble and mother-of-pearl (this is the main sign of difference from KAPA, in the future do not confuse souvel and burl). The presence of mother-of-pearl stains on polished wood creates a beautiful shimmering picture that glows from within. Svil is also poorly processed, like burl, but not as hard.
The size varies from a nut to 1.5 meters in height (I myself saw one on a birch) and up to 2 meters in diameter (a ring-shaped suvel that completely covered the tree trunk). In the Vatican there is a font much more than a meter in diameter, carved from a single piece of suveli. I myself was once sitting in a chair carved from suveli. It holds fine threads perfectly, but cutting suvel is not recommended. It is better to sand and varnish (impregnate with oil). The product will only benefit from this.
The most valuable is the root or butt fork. The presence of dark veins and clearly defined twisted annual rings. This is a fairytale. BEAUTIFUL, that says it all. Barrel suvel has a finer texture and a more subtle “frosty” pattern. And lighter wood. In terms of strength, butt suvel is slightly superior to trunk suvel due to the structure of the tree trunk. Suvel is durable, beautiful, easy to polish and grind. Well-dried and treated, it begins to “glow” from the inside (with proper impregnation with oils, the wood becomes like amber and even a little transparent). Usually has a color from soft yellow to pinkish-brown to completely ocher-brown. It all depends on the conditions and drying time. The cap has the same colors.


As you can see, the cap is completely different from suvel.
CHAGA- this is a mushroom (not to be confused with the tinder fungus!!!) and we do not need it for our purposes.

So, how to dry it. I’ll say right away that the “steaming” method is suitable for small pieces of wood. About half the size of a football or a small log.
1. We cut off the growth. We do this with a sharp saw. Otherwise, you will get tired of sawing, and the tree will begin to become shaggy. We do not peel off the bark. Don't forget to cover the cut on the wood with oil paint or wax or something similar.
IT IS PREFERABLE TO CUTT OUT THE GROWTH DURING THE DRY TIME OF THE YEAR, IDEAL AT THE END OF AUGUST, THE BEGINNING OF SEPTEMBER, BEFORE THE COMMONATION STARTS.
2. Take an unnecessary pan (bucket) and throw a piece of wood there. The pan is unnecessary, since during the cooking process a very tricky broth is formed which is then very troublesome to wash off. It is better to clean the wood of any rags of birch bark and other fragile and dangling pieces. they will still fall off. I'm considering exactly birch growth, as the most affordable and beautiful, the remaining growths are cooked using the same technology. The log is accordingly cleaned of any debris and fragile particles. Pour water. It is convenient to do this with a faceted glass (it contains 250 ml). The water should cover the piece of wood by about a centimeter or two. The tree naturally floats up, but let’s press it to the bottom and we’ll see everything. It doesn’t matter what kind of water you pour, cold or hot, it will still boil. You can throw as much wood into a saucepan as you like; what is important is the volume of an individual piece of wood and not the total volume of wood.
3. Take table salt, whatever you don’t mind. We're not making soup. For a liter of water, pour 2 large tablespoons of salt (who will count glasses of water??? Eh?). You can do more, as much as you like, it’s okay, it’s impossible to overdo it. The main thing is that the water is sickly salty. You can use clean sea water (precisely clean, otherwise it will smell disgusting of mud). The salt will draw sap from the tree, but will not saturate the tree.
4. Find sawdust of resinous wood. Spruce and pine are the easiest to get. Take a saw and go ahead. We need two powerful handfuls of sawdust (raking the sawdust with both hands). Precisely sawdust, not shavings from a simple hand plane. The shavings will come from an electric planer (you can get them at the nearest sawmill or plan them yourself). I always use them. They are quite small and are usually plentiful and easy to obtain. The more resin in the sawdust, the better. And the finer the sawdust, the better. Pour into a saucepan. You could have taken a bigger saucepan! Sawdust will give the suveli a pleasant ocher color. From soft pink-yellow to ocher-brown. Resins will also add strength to the wood and reveal texture.
5. When the water boils, reduce the heat and leave it simmering for 6-8 hours, longer if you have the patience. If the saucepan is large, then you don’t have to turn down the flame, let the water boil and bubble. But you need to watch so that the water does not boil away completely. Salt, sawdust, temperature and time will do their job. Add water as needed. During the cooking process, a red “broth” is formed. And scale. It is better to remove scale immediately. It is very difficult to wash off.
6. 6-8 hours have passed (depending on the size of the piece of wood). We take out the piece of wood. We rinse under running water to remove sawdust. We dump the water from the pan as unnecessary, but you can leave it for next time if you have somewhere to store it. But it's easier to pour out the water. We throw the growth onto the cabinet, wrapping it in nothing. Let it cool for a day or two.
7 We repeat the cooking and drying process 2-4 times depending on the volume of the wood. To speed up the process, you can use a pressure cooker. The time is reduced to 4-6 hours.
8. During the last cooking, you need to quickly peel off the bark while the tree is hot. Although she herself should fall off by this time. Carefully!!! Hot!!! use gloves!
9. We throw it on the closet for a week or two. The tree is basically already dry, but let the remaining moisture go away. The tree will “get used” to the atmosphere. After final drying, the wood will become bone-like and can be cut, sawed, or sanded. There will be no foreign smell. It will only smell like wood.
10. In the process of accelerated drying of wood, it must be remembered that small cracks may appear, and therefore it is necessary to allow allowance for their removal in subsequent processing.
11. Where to look for growths... Naturally in the forest. BUT! There are no specific places of growth, they grow spontaneously, and the biggest and most beautiful growths will be found by the most big-eyed and persistent. This activity is akin to mushroom hunting; whoever ran around the forest further and further got more. Look like that's it:. I remind you once again that large pieces cannot be dried like this. Cracked. Necessarily. Verified.
12. After the wood has finally gotten used to the atmosphere, we make a knife. You’ll find out how to do it yourself, big kids. In any search engine you’ll type in “how to make a knife” and you’ll be happy. It is advisable to soak the suvel and cap with oil and, if desired, with wax too. The wood will show its texture, “play” as they say, and all its inner beauty will appear.
A burl is also called a “witch’s broom” - it is a small formation on a tree of a benign nature. Basically it has the form of a drop from which thin branches grow, collected in a bunch. In the cross section, you can observe a structure of striking knots. Processing the burl is not easy, although it can still be ground and polished. The result of the work has a very attractive appearance.
Some areas of birch burl may have a mother-of-pearl appearance. In industry it is not of particular value, but is quite expensive due to its beauty and uniqueness.
Sometimes burl can be used as a veneer for furniture, but most often it is burl from exotic trees. But birch burl is used to make beautiful boxes, small women’s jewelry or hairpins, and cigarette cases.
Birch burl has a high-quality texture, so a knife with a wooden handle is very beautiful and expensive.
It is impossible to find two identical burls in nature; even the halves differ from each other. They can be seen on many different trees. In our latitudes it is highly valued birch burl. It does not grow large, the maximum diameter is like that of a large plate.
Due to the dense texture, it is difficult to make any design on the mouth guard, and there is no point.

So that the birch burl can be used for its intended purpose in the future, it is very important to assemble it correctly. To do this, we will provide you with detailed instructions:

Correct processing of birch burl
Very often, when sawing a burl, a unique and inimitable pattern is formed that the master will not want to change. In other cases, the burl after sawing is processed:
- Large burls are almost always sawn, since several items can be made from it at once. The burl is divided into several plates, the thickness of each depends on what kind of object you plan to make.
- In order to get an excellent drawing in the future, you should think about the cutting angle in advance. The more sleepers there are on the cut, the better.
- When the burl is fresh, the pattern appears weakly, but sawing is much easier.
- To ensure that the drawing appears in full beauty, the cap should be thoroughly steamed before making the item.
- You can steam the burl at home; fine sawdust is suitable for this. To carry out the procedure, take a container of the required size (it is recommended to use an old pan, since the dyes that will appear cannot be washed off). The sawdust is spread in a generous layer on the bottom, and a drip is placed on top. You cannot lay them tightly; there must be a gap of at least 0.5 centimeters. Sawdust is sprinkled on top in a thin layer.
- The placed cap is poured into a saucepan with well-salted water (mostly bottom layer). The water should not completely cover the workpieces, but only touch them a little. Salt is taken at the rate of 1 tbsp. l. for 1 liter of water. If it’s a little more, it doesn’t matter.
- The prepared cap is covered with a lid and placed on low heat. As soon as the mixture boils, count for about 10 hours and allow the burl to steam well. To avoid troubles, look into the container every hour and add water if necessary.
- After a while, remove the container from the heat and leave to cool.
- After cooling, the workpieces are washed under running water and left to dry. To ensure they dry evenly, they should be turned over every few hours. The drying period lasts about 3-4 days.
- When the workpieces are completely dry, they are again steamed according to the above scheme and dried again. The procedure is repeated up to three times.
- If after steaming the bark does not fall off completely, it is carefully removed by hand.
- It is preferable to carry out the drying procedure outside. The first day they are turned over quite often, on the third day 1-2 times will be enough.
- It’s great if it is possible to carry out final drying in a special oven several times.
- If the drip is very large (larger than a basketball), this type of treatment will not work. The drying or steaming process may cause cracks and other damage.
- Boiled as basically divided into parts. Whole growths on birch are treated as common tree– by sanding and varnishing.
- When evaporated, the burl plates acquire the shade of the released components; it can be very diverse (yellow with a golden tint, brown, etc.).
- After treatment, subsequent procedures can be carried out, for example, varnishing or painting.
- Before varnishing, the surface is sanded well using coarse sandpaper, then fine sandpaper. Wood dust is wiped off with a soft cloth.
- The design will appear in all its glory if the tray is treated with wax.
In fact, working with a burl is very painstaking, requiring attention and a lot of time. But what comes out of the work is certainly pleasing. Birch burl makes excellent souvenirs that have an individual and unique design.
A wide variety of crafts (boxes, cigarette cases, frames, etc.) have long been made from burl, a material of extraordinary strength and beauty. Excellent examples of burl, or, as it was called, “onion” dishes, dating from the 16th-17th centuries, are kept in the Armory Chamber of the Moscow Kremlin, as well as in the Zagorsk State Historical and Art Museum-Reserve. Looking at them, you won’t immediately think that they were made with an axe, a scraper and a knife from a piece of wood, or more precisely, a growth on a birch tree.
The name of such a growth is kap, and it comes, as is commonly believed, from the ancient Slavic word “kap”, which means head. At first glance, a burl growing on a tree really resembles in shape human head. Burls can be found both on the branches of old trees and on the trunk itself - stem burl. If you remove the bark, you will see that the “head” is all covered with tubercles, papillae, and needles. The rarest and therefore most valuable burls are found, as a rule, on the branches. Usually its dimensions are small: 10...15 cm, but sometimes there are specimens up to 40 cm or more. To determine the value of the growth, the master made a small cut and with a damp cloth, or even simply, impatiently slobbering on his finger, ran it over the cut to see the main thing - the pattern, unique in each burl “smelting”. The burl lends itself well to processing, does not warp, does not crack, does not swell, does not shrink, and is also so durable and weighty that some “craftsmen” wastefully make hammers out of it.
Burls are found on oak, walnut, black alder, aspen, but most often on birch. Sometimes there are several burl growths on one tree. Some experts believe that the most beautiful wood is birch burl, others - walnut. A cap root is nothing more than a burl formed at the root collar of a tree. Sometimes it protrudes above the surface of the earth. The “underground” burl (on the roots) can be detected by the shoots it sends out every spring. These non-viable, quickly withering shoots give the texture of the caporoot black dots located among the lighter-colored fibers of the trunk.
Caporoots are either circular, encircling the tree, or lopsided. The latter are most often formed with south side. The largest of the caporoots reach a diameter of up to 2 m and weigh up to a ton.
Oak and walnut caporoots are especially large in size. More than one tabletop can be made from these. The old masters of Vyatka once covered furniture with plates sawn from caporoot. True, the root burl is not valued as highly as the real one, grown on a tree trunk or branch. The wood at the root burl is softer, and the pattern is simpler. Large cap root is characteristic of birches 70-80 years old, growing freely in clearings or forest edges. As a rule, burl birches grow most often in mixed forest, usually along streams, small rivers, near lakes and swamps, and they usually do not grow too close to each other.
The burl also has a double - suvel. This is a woody fold that sometimes forms at the site of a bend or break in a young tree. Suvel wood is also quite strong. Cabinetmakers use it to make handles for tools, turn out skittles and croquet balls. It is quite simple to distinguish a suvel from a burl, since the surface of the first is smooth, and its cut (cut) does not have the main advantage of a burl - a beautiful texture. On the same section, only long and sparse zigzags of fibers are visible.

