26.12.2021
Fetch intitle datalife engine control panel. Adding pictures and files to DLE. Detailed instructions for installing DLE
Hello. I want to devote this topic to creating the simplest module for the popular CMS Datalife Engine. In Russia, as well as in the CIS countries, it is quite popular, but for some reason there are still no articles about this cms on Habré. I will try to correct this misunderstanding. In this article, you will learn how to make a simple module for this CMS, as well as get acquainted with the structure of the engine.
Introduction
I would like to note that the system is in demand among entertainment sites. It is understandable, the system is easy to use, has a sufficient number of modules and templates. And almost everything you need is out of the box. However, sometimes something is missing. We will try to solve this problem.Why DLE?
You will probably wonder why I chose this particular CMS. The answer is simple: a fairly logical structure of the engine itself, separation of templates from code, a fairly simple template engine, again, a fairly logical placement of everything inside - it's easy to figure out what's what. Plus, the system remains relatively light and comfortable. It is not as functional as, for example, Drupal, but still I like it.Structure
First we need to know something about the structure of the engine. You can’t create a mess on the server, so we will keep everything in our folders.Modules for the operation of the engine are usually placed in a folder /engine/modules/.
In folder /engine/inc/ admin panel files are located.
Starting with version 8.x, it appeared to connect modules directly in the template. The template is located in the /templates/template_name/ folder. This folder contains the main.tpl file. This is the root template file, usually the main structure of the template is located in it. Usually the module can be connected like this:
(include file="engine/modules/mod_category.php")
Where mod_category.php is a file located in the /engine/modules/ category. I think this is all clear, let's move on.
Let's make a module for displaying the latest comments with caching. To do this, let's create a file in the /engine/modules/ folder and call it mod_lastcomm.php Next, I provide a code listing of this file with detailed comments.
Code
DATALIFEENGINE". This constant is defined in index.php and its value TRUE means that the file is included with include/require, and not just run. */ if(!defined("DATALIFEENGINE")) ( die("Hacking attempt! "); ) /* Include the api class so that we can use functions to work with the cache. */ include ("engine/api/api.class.php"); /* Try to read the information stored in the cache from name lastcomm. I recommend giving meaningful names to everything that we store in the cache. lastcomm is a file in a folder /engine/cache/, A 60 is the cache lifetime in seconds. In this case, if more time than 60 seconds has passed since the creation of the file, then we will again have to climb into the database. */ $lastcomm=$dle_api->load_from_cache("lastcomm", 60); /* Check if we have a cache or not. If not, then we climb into the database. */ if (!$lastcomm) ( /* The actual query to the database. It is executed using the $db class function. The PREFIX constant contains the prefix specified when setting the cms. The column names are named quite normally, I think there is no need to explain what they do. The query ID is stored in the $sql variable */ $sql = $db->query("SELECT comments.post_id, comments.text, comments.autor, post.id, post.flag, post.category, post.date as newsdate , post.title, post.alt_name FROM " . PREFIX . "_comments as comments, " . PREFIX . "_post as post WHERE post.id=comments.post_id ORDER BY comments.date DESC LIMIT 0.20"); /* C using the get_row() function of the $db class, we read each row from the selection results sequentially.The information is entered into the $row array with indices equal to the table field names */ while ($row = $db->get_row($sql)) ( /* If necessary truncate news title */ if (strlen($row["title"]) > 50) ( $title = substr($row["title"], 0, 50)."..."; ) else ( $title = $row["title"]; ) /* Generate a link to the user's profile. Similarly */ $aname=urlencode($row["autor"]); $name=" ".$row["author"] .""; /* We form the text of the comment and trim it if necessary */ $text = htmlspecialchars($row["text"]); if (strlen($text) > 1024) $text= substr($text, 0, 1024) ."..."; /* Generate a link to the news. The $config array contains all system settings. In particular, $config["http_home_url"] is the domain url. */ $newslink = $config["http_home_url"].$ row["post_id"]."-".$row["alt_name"].".html"; $hint = "onMouseover=\"showhint("$text", this, event, "");\"" ; $title = " ".stripslashes($title).""; /* Total entry for one comment */ $lastcomm.="From $name in news:$title
"; ) $db->free(); /* Cache the received data. To better understand the caching functions, open the file "engine/api/api.class.php" everything is perfectly commented out there */ $dle_api->save_to_cache (" lastcomm", $lastcomm); ) /* Output the result */ echo $lastcomm; ?>
Conclusion
This code is fully functional. And of course it has its drawbacks. For example, it is not checked for links - whether the CNC is enabled. Or when you click on the link to the user's profile, we immediately get to his profile, and not to the jQuery window with brief information. In general, there is something to improve. But all these things were not included here for one reason only - to prevent confusion for a beginner. I also advise you to analyze other files, such as topnews.php. If you have any questions about writing modules or about the system in general, I will be happy to answer them.That's all for me, if this topic seems interesting to someone, then I will make a series of articles about the cms Datalide Engine (DLE).
Oh yes, this is my first article on Habré, so sorry if something is wrong.
Based on the DLE engine (DataLife Engine). I will describe the setup in great detail, trying not to miss anything, I think that the dle setup will turn into a long series of posts. In this series of posts, we will not only take a detailed look at the setting, but also understand what each setting function is for.
For posts dedicated to setting up the DLE engine, I will use the DataLife Engine v.9.4., More precisely, a demo version of this engine. This is quite enough for me to tell you about the settings and capabilities of the DataLife Engine.
The first article will be devoted to the admin section: “ General script settings". You can find this section as follows: after going to the DLE (DataLife Engine) admin panel, which is located at site.ru/admin.php, you will see quick access to the main sections of the admin panel. Today we need an item " System Setup" , and in it the section " general script settings". There are, of course, other ways to get into this section, but in my opinion this is the easiest way.

So let's start setting up the dle engine, the first point is title (title dle). In the title, write the name of your project, for example: Everything for beginner webmasters. Your title can sound anything, by default on the DLE engine, the site is called DataLife Engine, if we enter any other name, it will be changed. And it will form the title dle, which will be displayed in the browser tab, as well as on the search results page. Therefore, take the title seriously. Here, I think it's clear.

Well, Homepage, I think it's understandable. We enter the name of your domain, for example: site.ru and that's it.
Used encoding, by default, is windows-1251, which means that your resource supports the Russian language. If you have a demo version of the DataLife Engine, you don't need to change anything here. If the CMS is purchased, then the encoding can be changed, for example, to UTF-8 and then your project will become multilingual, at this stage we will not consider the encoding in detail, I think it’s clear if you don’t change the demo, even if it’s purchased, but the domain is in the ru zone, to be honest, I see no reason to change the encoding.
Next item: Description, in which we briefly describe the content of our project, for example: Everything about creating, setting up and promoting blogs or sites, etc., but no more than 200 characters. In theory, this description should be displayed in search engines, so take this seriously, and do not forget to write in the description the keywords that your resource will be promoted in the future. It will look something like this in a Google search engine:

Further, keywords(we enter words separated by commas), also according to these words, search engines will pay attention to your page, keywords should correspond to the direction of your site or blog as much as possible, first you need to make a list of keywords and check the number of requests for these words. To check the number of requests, we use this page on the Internet http://wordstat.yandex.ru. We will not consider it in more detail at this stage, since this no longer applies to this topic of the post, but to optimization in search engines. Here, see for yourself what to write in this field, for each keyword will be different.
Short name, here I think everything is clear. This name will be displayed in the speedbar module. You can, again, repeat the name of the project. So we figured out the names, we continue. The speedbar module (aka breadcrumbs) looks like this:

Time zone correction, serves to correct the time on the site. For example, your server is set to Moscow time, and you live in a different time zone and want the time on the site to match your time zone, then this is corrected in this column. How to fix everything is clear there, we write the hours in minutes, the current time of the server is also written in this column, you can navigate by this time.
In the column, (human-understandable url), it is advisable to select "Yes". It is needed in order for your address to be visually perceived by users, which has a good effect on the usability of your resource. To make it clearer, I will give examples of news with and without CNC, news with CNC dle : http://site. ru/addnews.html, without CNC: http://site.ru/index.php?do=addnews, i.e. with CNC, the visual perception of the link is much better than without it.
Then choose CNC type, here everything is in your hands, but I do not advise choosing the third type as it increases the load on your server.
Handle invalid CNC URLs: Here I suggest to put "Yes" as this option is useful for SEO, but you can leave this option off if you want. More details for what it is needed, in the settings it is written, it is quite clear.
Then choose language used, since I have a demo version, my choice is not big, only one language is Russian, but for the ru domain zone, this will be enough.
Further, default site template — is default, but you can choose another. This topic will be covered in a separate article on how to install a template on the DataLife Engine (DLE). Of course, we all want some special, non-standard template, looking ahead, I will say that installing a template on dle is very simple. Download the template you like from the Internet or make your own, copy the template folder to the engine directory, to the templates folder, and if your resource is on a local server, restart it. And now the template will appear in the default site template selection column.
After choosing a template, go to the two settings " Enable WYSIWYG editor...“, in both cases, I recommend choosing “Yes”, as it is much easier to edit news (articles) and comments using a visual editor than using BB codes. Although, it's up to you to choose, experiment, and make a choice in favor of convenience. DLE WYSIWYG editor is a visual editor.
This is how the editing panel looks like, using BB codes.
This is what the editing panel looks like using DLE WYSIWYG.
Next comes a rather useful option: turn off site«, this option takes the resource offline, if you think that your project is not yet ready to be seen by users, then enable this option. If everything is ready, then turn off the option and release the project to the network. You can also use this function when updating the structure or template of your resource. I note that this option is useful if your "experimental" is hosted, and not on a local server, like mine.
Last option ( reason for shutdown) will be useful to those who take advantage of the shutdown of the site. The reason for the shutdown is already written in the text field, which you can edit for yourself or write your own reason.
That's all. You have taken the first step towards setting up DLE (DataLife Engine). Now it remains to save the general dle settings and wait for the next post about setting up the DLE engine.
Note: posts about setting up DLE (DataLife Engine) will be submitted in this form, for a better perception of the information received, so as not to make a mess in the head. Of course, it was possible to describe the entire setup in one article, something like this: select it here, put it here, write like this there. But I want you to understand what each function is for. There are too many settings and features in DLE for one post. I hope for your understanding.
There are a huge number of sites on the Internet, and they all work on different engines. The differences mainly lie in the functionality of the engines and in the convenience of work for outside users of the sites. The most popular engines are Joomla, WordPress, Drupal, DLE. We will dwell on the latter in more detail, since, being one of the most convenient and simple engines, it is increasingly chosen by webmasters and becomes the basis of most web resources.
The DLE engine is the DataLifeEngine, the basis that was previously intended to be used for resources with news feeds and reviews. Today, a wide variety of sites dedicated to any topic work on this engine.
The DLE engine has earned its popularity thanks to its huge functionality, which is described in detail on the dle-news.ru website. The creators of this engine offer two versions of their product: paid and free. It is quite logical to assume that the free version will be with more limited features. But despite this, the free version of the DLE product is an excellent engine for both novice webmasters and more advanced ones. Sites not only with news, but also dedicated to cooking, medical topics, etc. work great on it.
What hosting can I install DLE on
Before you start installing the DLE engine, it would be nice to get acquainted with the requirements that it imposes on the server. First, there are several installed libraries: PHP Zlib, PHP XML, PHP GD2, PHP iconv. In addition, the software must include Apache version 2.0 or higher, PHP 4.3.2+ or PHP 5.0+, and MySQL version 4.0 or later. RAM should be at least 8 megabytes, but this is the minimum. Nobody forbids using RAM with 16 megabytes, on which the product will work even better.
When using the DLE engine on the server, it is better to disable the safe mode, which is designated as SafeMode.
Hosting Compliance Check
The description of the installation process, which you will read below, is based on the conclusions made after installing the engine on a test web resource. For a more visual example, screenshots of each stage of the installation process are provided.
We start the installation by checking the full list of settings. To do this, add a text document to the root of the site, give it the name phpinfo.php, and write the code into it:
Then we launch the script that we managed to create. In the browser, we type the following: https://my_site.ru/phpinfo.php. After that, we can see the following picture on the page:
Those places that are circled in red are the main parameters that determine the further work of the created web resource. For example, in order to be able to work with graphical objects, the normal operation of the PHP GD2 Library is required. If it is installed incorrectly, the captcha will not be displayed on the site.
Also, in order for the created web resource to work normally, you need to install the MySQL database. The system will ask for a username and password. In order not to forget these data, it is better to write them down somewhere. To configure the database, we use the control panel that is on the hosting.
Detailed instructions for installing DLE
After the package with the engine is downloaded to the computer, it must be unpacked and installed. But we will not install everything in a row, but only the upload folder and the Documentation folder. In the event that the hosting has a function for recognizing zip archives, the installation process will go faster. If this function is not supported, then files from the archive will have to be downloaded separately.
It is very convenient to work with TotalCommander when installing the DLE engine. When you copy files or folders to the server, the checkbox "Translate file names to lowercase" must be unchecked.
If the server allows you to recognize and unpack the archive, we put into it all the files that are in the upload folder at once. 
Now we close the TotalCommander and continue the installation using the ftp client. For the correct operation of the site, you must very carefully enter the data of the files and folders of the server. 
To correct the Attributes, you need to select the desired folder. After you change the permissions of a folder, they are not replaced with the contents of the folders. It is most convenient to select files and folders that we will change using TotalCommander or the keyboard shortcut Alt + A. 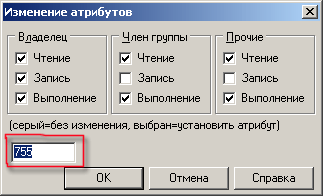
In the opened window, enter what we need and click OK.
- Set the permissions for the templates folder and all its subfolders to write (CHMOD 777)
- Set write permissions for all files in the templates folder (CHMOD 666)
- Set write permissions (CHMOD 777) for the backup, uploads folders, as well as for all folders inside them.
- Set write permissions (CHMOD 777) for /engine/data/, /engine/cache/, /engine/cache/system/ folders.
When all the adjustments are made, enter the following entry in the browser: https://proba.regciti.ru/install.php. It means that we are going to run a file called install.php. After the file is launched, hints will appear in each window that opens. Focusing on these signatures, we continue the installation process. In principle, it will start automatically, and the system itself will check all those files that should be installed and inform you when the installation is complete.
Now you can see the preliminary result of what you have been working so diligently all this time. Enter https://your site name/index.php into the browser line. A demo page will open in front of you. To enter the admin panel and start working, you need to enter the following entry in the address bar: https://your site name/admin.php. If installed correctly, the following picture should appear on the screen: 
We agree with the offer, which is displayed in the lower left corner and start the installation. After clicking this button, a window will appear asking you to read the terms of the license agreement. The transition to the next page will only occur if you accept this agreement and check the appropriate box. Click "continue": 
After that, the process of checking all those components and files that have been installed will automatically begin. The script will automatically point out the errors that have been made and that need to be corrected in order to continue working. This picture has a list of several items. They should be without a red stroke - this will mean that the script did not find any errors and you can continue working further. If any item is in a red stroke, we fix the error. In principle, the script may require you to fix errors, and you can refuse, but then expect the system to fail at some points. And it will only be your fault, not the providers and not the users. If the errors cannot be corrected, you can ask for advice or help from the provider that provides you with a place on the server. 
At the bottom of the box there is also a list of items that should be without a red stroke. But these errors are not so critical and may not affect the work of the future site. The thing is that the script has certain standard settings, and they may not always match the user settings. It is better at this stage to consult with the hosting provider and clarify whether some of the settings highlighted in red may not coincide with those proposed by the system.
We continue and get a new window that opens. Here you can find out what errors were made at the moment when you made changes to Attributes for folders and files. The script itself will show you where you made mistakes or missed something. 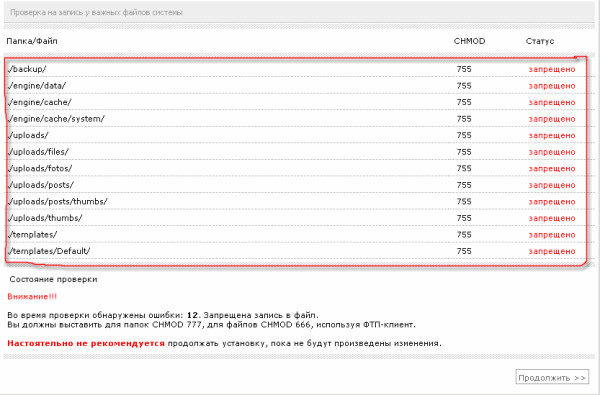
If there are still errors, it is better to fix them through an FTP client. after the adjustment, we refresh the page and see if there are still places where adjustments need to be made. If you did everything right, and the system did not allocate places with errors for you, congratulations! You have successfully passed one of the most difficult and crucial stages of installation, and now you can safely continue it! 
MySQL server:
MySQL encoding:
The following picture shows places that need to be entered very carefully and correctly. 
The database name will be the same as we assigned it at the very beginning. In our case, this is proba_regciti.
In the "Username" item, enter the login of the user on whose behalf the database was created. At that stage, we wrote down the login and password just in case.
Specify the email address in the E-mail line. Click "Continue". If there are no input errors on the previous page, you will see the inscription: “Congratulations! Installation completed successfully."
In the next window that opens, pay attention to several points. 
When you installed the script, a database was automatically created with it, an admin cabinet and system settings were created. In order not to knock down all the settings and not start a re-installation, it is recommended to delete install.php.
I hope now you understand how to install DLE on hosting. If you still have questions, ask them in the comments to this article.
Published by authorData Life Engine (DLE)is a multi-user news engine designed to organize your own blogs and media on the Internet. With a powerful system for publishing, customizing and editing news, the engine is one step ahead of its closest competitors. And thanks to the precise and thoughtful structure of the kernel, which minimizes the requirements for server resources, the engine is able to easily work with highly visited projects without creating any special load on the server. Flexibility and ease of customization and integration of your own design will allow you to deploy your own sites in the shortest possible time, without any additional material costs. Using advanced AJAX technology will reduce both your server traffic and the traffic of your visitors, not to mention the convenience of using this technology on the site. Due to the increased attention to the security of the script, to the convenience of working with it, as well as dynamic development, more than 70,000 portals that successfully use it in their work have already spoken in favor of using the DataLife Engine. The engine is optimized for search engines, which will bring additional customers to your site.
Official site:http://dle-news.ru/
FAQ: http://dle-news.ru/faq.html
Please note that this software ispaid, and the installation will be discussed with an exampledemo version.
InstallationCMS DLE
To start installing DLE, you need to go to the hosting control panel using the link and data sent to your contact e-mail when ordering the service.
Download the CMS DLE (DataLife Engine) distribution, for example here http://dle-news.ru/demo.html .
Go to the hosting control panel, point "File Manager" and then to the directory www/domain_name. Delete by default the index.html file created when adding the domain, press the "Upload" button, select the CMS DLE archive and press OK.
After downloading the CMS DLE (DataLife Engine) archive, click on it once so that it is highlighted and press the "Extract" button. After unpacking the archive, you should come to this view:
Next, we need to create a CMS DLE (DataLife Engine) database, for this, in the hosting control panel, go to the "Databases" item and click the "Create" button. Enter the database name, username and password and click OK:

In the future, the name of the database and user is used with a prefix in the form of your login in the hosting control panel:
The Database Type column displays the database host db01.site.
After performing the above steps, we access the browser by the name of your domain, proceed to install CMS DLE (DataLife Engine), press the button "Start installation":

Note! To start installing CMS DLE (DataLife Engine) when accessing a domain, the domain must already respond to records from the hosting server. If the domain has just been added to the server and information about its records has not yet been distributed over the network, you can register and save the following entry in the hosts file on the computer: server IP address domain name
83.69.23*.*** domain name
The IP address of the server can be viewed in the hosting control panel under Domain names - Entries entry:
|
domain_name.ru. |
A (Internet v4 address) |
At the next step, to continue the installation, you need to read and accept the license agreement.
We put a daw "I accept the terms of the agreement" and continue with the installation.


9. One of the important steps during installation is setting up the system configuration, where you need to correctly specify the data for connecting to the database and set the login and password of the site administrator.
The data that is required from you (using the example of our user):
Base name: vh12345_dle
Database username: vh 12345_ admin
Password: the password you specified when creating the database
MySQL server: column Type of database in the section Databases db01.site(see item 4) or
indicate in this field mysql.your_domain
The prefix is set arbitrarily.

Data for access to the control panel- this is the creation of an administrator account for your site, here we indicate the desired login / password and e-mail of the administrator.
Installation of CMS DLE (DataLife Engine) is completed.
Delete file install.php, it is located in the directory www/your_domain
We request a domain through a browser, enter the CMS DLE (DataLife Engine) admin panel and start working with the site.

The following changes have been prepared and implemented:


1. Added the ability to authorize on the site using social networks. This support is enabled in the script settings in the control panel. And setting up social networks directly is carried out in a special new section of the control panel: "Setting up social networks". In this section, you can configure which social networks you want to support on your site, as well as specify the necessary parameters and keys for the operation of a particular social network. This section also provides detailed help on how to create applications in social networks for authorization. In total, six social networks are currently supported: Vkontakte, Odnoklassniki, Facebook, Yandex, Mail.ru, Google. Thus, your visitors can quickly log in to your site using their login and password on social networks, without having to go through the registration procedure with entering captchas, e-mail confirmation and other things.
text, which display the text enclosed in them, if support for authorization using the social network Vkontakte is enabled. And also the tag (vk_url)
text, which display the text enclosed in them if support for authorization using the Odnoklassniki social network is enabled. And also the tag (odnoklassniki_url), which displays a URL link for authorization in this social. networks.
text display the text enclosed in them if authorization support using the Facebook social network is enabled. And also the tag (facebook_url), which displays a URL link for authorization in this social. networks.
text, which display the text contained in them if authorization is enabled using the Google social network. And also the tag (google_url), which displays a URL link for authorization in this social. networks.
text, which display the text enclosed in them, if support for authorization using the Mail.ru social network is enabled. And also the tag (mailru_url), which displays a URL link for authorization in this social. networks.
text, which display the text enclosed in them if support for authorization using the Yandex network is enabled. And also the tag (yandex_url), which displays a URL link to authorize in this network.


7. For the user profile editing template (userinfo.tpl) new tag added (time zones) which displays a list of available time zones in the system, and allows him to choose his own time zone for his profile on the site.
8. Polls added, added to publications, display them not only when viewing full news, but also when viewing short news. To do this, in the short news template (shortstory.tpl) you can use tag (poll). The design of the poll itself is also carried out in the poll.tpl template
9. For short news output templates (shortstory.tpl) added the ability to use banner tags added in the management of advertising materials in the admin panel. Thus, you can display banners on the pages of your site together with tags very flexibly. (banner_x) and independently determine after which news on the page you want to display advertising.
10. For short and full news output templates (shortstory.tpl and fullstory.tpl) new tags added text, which display the text in them in the form of a link to add news to bookmarks on the site, as well as added tags text, which display the text in them as a link to delete news from bookmarks on the site. These tags will allow you to more flexibly customize the design of your site, for those who want to abandon the general tag (favourites), which displays only one pre-programmed picture for these actions.
11. Added new global tags for templates: text, which display the text enclosed in them if the site is viewed using a smartphone, as well as tags text, which display the text enclosed in them if the site is viewed by a visitor not from a smartphone. These tags are global and can be used in all template files. Thus, you can flexibly customize the output of your site's content, depending on the device used by the visitor, for example, manage the display of ads for devices and much more.
12. Added new global tags for templates: text, which display the text enclosed in them if the site is viewed using a tablet, as well as tags text, which display the text enclosed in them if the site is being viewed by a non-tablet visitor. These tags are global and can be used in all template files. Thus, you can flexibly customize the output of your site's content, depending on the device used by the visitor, for example, manage the display of ads for devices and much more.
13. Added new global tags for templates: text, which display the text enclosed in them if the site is viewed using a desktop browser (desktop computers, laptops), as well as tags text, which display the text enclosed in them if the site is viewed by a visitor not using a desktop browser. These tags are global and can be used in all template files. Thus, you can flexibly customize the output of your site's content, depending on the device used by the visitor, for example, manage the display of ads for devices and much more.
14. Added the ability to specify for static pages template files located not only in the root folder of the template, but also files located in the subfolders of the template.

16. For full-text search on the site, a logical search mode has been added, which allows you to significantly improve the search on the site and the relevance of the information found for the search query. This innovation allows showing the visitor the news, comments or static pages that are most suitable for his request.
17. Improved processing algorithm already existing links on the page when replacing keywords from the cross-references module. Now it is no longer necessary to have no HTML tags inside links, they will not be replaced regardless.
18. Improved algorithm for finding and replacing keywords from the cross-references module, thanks to which it was possible to significantly increase the speed of the script with a large amount of links.


21. For the template for displaying information about a registered user on the site (login.tpl) added the ability to display the values of his additional fields, which he filled out during registration or in his profile settings. To display additional profile fields, exactly the same tags are used as in profile templates (userinfo.tpl) and comment templates (comments.tpl).
22. Stationary ICQ field removed from user profile database. This decision was made due to the fact that this messenger has lost its relevance and the use of this field is insignificant, despite the fact that it takes up space in the database. At the same time, if necessary, you can create this field as an additional field for the profile and use it if necessary on the site.
23. Added indication of the page number being viewed full news, in the title meta tag, if the news was split into several pages.
24. Added option to script settings character assignment - separator, for module "speedbar" (breadcrumbs). This symbol will be used when displaying the navigation of this module, separating sections of the site. Thus, you can specify any custom delimiter, instead of the previously used symbol "»". 25. Added option to script settings assignment of a symbol - a separator, for the list of categories assigned to the news. This symbol will be used when displaying the list of categories when displaying news on the site, separating the assigned categories. Thus, you can specify any custom delimiter, instead of the previously used symbol "»".26. Added information output about third-party modules installed in the script control panel, in the left side panel for quick navigation through modules in the admin panel.


29. Added automatic cache reset compressed CSS and JS files when editing these files in the control panel template editor.
31. Added support for apostrophes, for additional news fields that are of type "Use values as hyperlinks" and do not have safe mode enabled. Thus, you can use, for example, words such as O "Brien, d" Artagnan, etc.
32. Added automatic generation of the CNC name for the category, when it is created in the admin panel, if it was not set by the user. In this case, when creating this name, transliteration from the specified category name is used.
33. When adding and editing categories in the admin panel of the script, added control of reserved CNC link names for categories so that users do not add names that are reserved in DLE for other needs. For example, you won't be able to add a root category named "catalog" because that name is used to organize a catalog site, but you can use that name for a subcategory where that name is not already reserved, etc.

36. Updated Jquery library to the current version v1.11.1
37. TinyMCE visual editor has been updated to the current version.
38. Updated to the latest version of HTML5 player, which fixed some playback bugs.
39. Problem fixed, in which the script settings management in the admin panel did not work when using smartphones and tablets.
40. Problem fixed, at which there was an incorrect check for the fullness of the add. fields, if there was a required field with a different type before the field with the "list" type.
41. Problem fixed, in which if the search is repeated, and the user was not on the first page of the search results, he could receive a blank page if less news was found in the new results. Now the new search returns the user to the first page of the search results.
42. Problem fixed, in which the "speedbar" module (breadcrumbs) displayed the user's nested location on the static page, and at the same time he was actually on the main page of the site, if the default static page was enabled for the main page of the site in the script settings.
43. Problem fixed, in which if the user edited the news, waiting for moderation on the site, he could not manage the pictures uploaded to this news, and if, when editing the news, he uploaded the pictures again, they were not assigned to this news.
44. Problem fixed related to incorrect work of text tags when they are used in a custom tag news display (custom ...)
45. Minor bugs in the script that were discovered and announced earlier have been fixed.
Information for downloading the script for clients:
Attention! Viewing this information is available only to users who have a license for the script. If you have already purchased the script, then you need to go to the site under your client account.
If you are not yet our client, then you can visit our website.
You can discuss the release at

