03.10.2020
How to make a powerful flashlight with your own hands. Homemade flashlight from an LED strip and a dead screwdriver battery. A question of price and quality
A flashlight is a necessary thing when traveling to nature or out of town to the country. At night, on a personal plot or near a tent, only he will create a ray of light in a dark kingdom. But even in a city apartment, sometimes you just can’t do without it. As a rule, it is difficult to get something small and rolled under a bed or sofa without a flashlight. And although there are devices nowadays that are multifunctional and can be a source of light, some of our readers will surely want to know how to make a flashlight with their own hands. How to make a small device from improvised items will be described later.
Classic form
The most convenient design, which, in principle, has remained unchanged for flashlights for many years, is a design that contains:
- cylindrical body with batteries of the same shape;
- a reflector with a light bulb at one end of the housing;
- removable cover from the other end of the case.
And this design can be obtained using unnecessary household items. If you make a lantern with your own hands, of course, there will be no beauty of forms like that of an industrial design. But it will be functional and a lot of positive emotions will be received from a working homemade product.
So, the main problem, which at first glance is difficult to solve, is the reflector. But it just seems complicated. In fact, we are surrounded by many objects that can become a blank for a number of reflectors of different sizes. These are ordinary plastic bottles. Their inner surface near the neck is very close in shape to that which has a reflector made at the factory. And the lid is as if created to mount an LED in it, which today is the best light source. It is brighter and more economical than a miniature light bulb.
We make a reflector
It is not a problem that you can not find a tube of suitable dimensions for making a case. It can be glued from individual parts. For example, from unnecessary disposable ballpoint pens. To spring the contacts, you can use a spiral, which is used for page bindings, and make contacts from thin sheet metal, the raw material for which will be a tin can. Therefore, we start by choosing a plastic bottle of the desired size and selecting the remaining elements. The smaller the bottle, the more rigid and strong the reflector will be. Fastening parts during assembly is easiest to do on the basis of building sealant.

So, let's start making a flashlight with our own hands. Cut off the neck and the parabolic part of the body from the bottle with a sharp knife and trim the edges with scissors.


For effective reflection, we use the foil in which chocolate bars are wrapped. If its size is not enough, you can cut a larger blank from a roll of foil intended for baking products. To keep the foil on the surface, apply a thin layer of sealant. Then we press and level the foil over it. If she frowns, it's not a problem. The main thing is that there are no swellings, and she repeats the shape of the base.
We press the foil with our fingers and, smoothing out the bumps, form the most even surface. We trim the foil along the edges with scissors flush with the plastic base. Along the contour of the neck, we make a cutout with a knife for the LED, which will subsequently be installed in this place on the panel.


We make it from the bottom of the bottle cap, cutting off the threaded edges with a sharp knife and, if necessary, trimming them with scissors. Then, having made two holes in the socket with an awl or the tip of a knife, we pass the legs of the LED through them, pressing its base to it. For the correct installation of the LED lamp in the center of the cover, it is necessary to correctly select the distance between the holes according to the location of the legs at the base of the LED.


We bend the LED leads to the sides until they stop against the edges of the panel. We twist the conductors to them. If the twist turns out to be unreliable due to the properties of the wire cores or for other reasons, soldering is used. The conclusions after attaching the wires are bent along the panel. It is recommended to check the performance of the received part with the batteries used in the flashlight.


Then we cut out a contact pad for the battery from the tin sheet, which rests against the socket with the LED. By twisting or soldering we connect the pad - the terminal with a shorter wire. We attach the terminal to the spring, which in turn we attach to the socket. We use sealant to fasten the elements.


Then we glue the socket with the LED into the reflector.

Bottom and battery case
The part of the flashlight housing opposite to the reflector is also made from a part of a bottle with a neck. But only from the very neck with a lid. A terminal made of tin sheet is glued to its inner wall. A wire is also attached to it. This wire and the second wire from the LED will be used to control the flashlight. The terminal contacts the battery, being pressed by a cover that is screwed onto the neck.


The two main parts are ready. Now we need to make a battery case. To do this, we use dried and therefore no longer needed felt-tip pens. We leave only the body from them, which we shorten in length and cut along the ends along the axis, making two protrusions for gluing. Before cutting, make marks with a marker, applying the body of the felt-tip pen to the parts to be glued.


We apply glue to the protrusions and glue them, respectively, to the reflector and the back.


Then we cut out the details of the switch from the tin sheet. We mount the wires to them and glue the parts to the body.


We insert batteries into the flashlight and use it. This, of course, is not a factory-made flashlight with a high-quality reflector and high beam. But on the other hand, it is handmade, it is your own product, which gives good close-range lighting and gives great pleasure, and money cannot buy it. Now you have a visual representation of how easily you can make a lantern yourself.

 Ready flashlight and light from it
LED light sources are by far the most popular among consumers. LED lights are especially popular. You can get an LED handheld flashlight in different ways: you can buy it in a store or make it yourself.
LED handheld flashlight
Many people who understand at least a little electronics, for various reasons, are increasingly choosing to make such lighting fixtures with their own hands. Therefore, this article will consider several options for how you can independently make a diode handheld flashlight.
Advantages of led lamps
To date, one of the most profitable efficient light sources is the LED. It is able to create a bright luminous flux at low power, and also has a lot of other positive technical characteristics.
Making a flashlight from diodes with your own hands is worth it for the following reasons:
- individual LEDs are not expensive;
- all aspects of the assembly are fairly easy to implement with your own hands;
- homemade lighting fixture can run on batteries (two or one);
Note! Due to the low power consumption of LEDs during operation, there are many schemes where only one battery acts as the power supply for the device. If necessary, it can be replaced with a battery of the appropriate dimensions.
- the presence of simple schemes for assembly.

LEDs and their glow
In addition, the resulting lamp will last much longer than analogues. In this case, you can choose any color of the glow (white, yellow, green, etc.). Naturally, the most relevant colors here will be yellow and white. But, if you need to make a special highlight of some celebration, then you can use LEDs with a more extravagant glow color.
Where can I use and features of the lamp
Very often there is a situation when you need light, but there is no way to install a lighting system and stationary lighting fixtures. In such a situation, a portable lamp will come to the rescue. The LED handheld flashlight, which can be made with one or more batteries, will find extensive use in everyday life:
- it can be used to work in the garden;
- carry out illumination of closets and other premises where there is no illumination;
- use in the garage when inspecting the vehicle in the inspection hole.
Note! If desired, by analogy with a hand-held flashlight, you can make a lamp model that will be easy to install on any surface. In this case, the flashlight will no longer be portable, but a stationary light source.
To make a hand-held LED flashlight with your own hands, you need to remember, first of all, the disadvantages of diodes. Indeed, the widespread use of led-products is hindered by such shortcomings as a non-linear current-voltage characteristic or I-V characteristic, as well as the presence of an “uncomfortable” voltage for power supply. In this regard, all LED lamps contain special voltage converters that operate from inductive energy storage or transformers. In this regard, before proceeding with the self-assembly of such a lamp with your own hands, you need to select the necessary scheme.
If you are going to make a hand-held flashlight from LEDs, it is imperative to think over its power supply. You can make such a lamp on batteries (two or one).
Consider several options for how to make a diode handheld flashlight.
Scheme with superbright LED DFL-OSPW5111Р
This circuit will assume power from two, and not from one, batteries. The scheme for assembling this type of lighting fixture is as follows:

Flashlight Assembly Diagram
This circuit assumes that the lamp is powered by AA batteries. In this case, an ultra-bright DFL-OSPW5111Р LED with a white type of glow, having a brightness of 30 cd and a current consumption of 80 mA, will be taken as a light source.
To make your own mini-flashlight from battery-powered LEDs, you need to stock up on the following materials:
- two batteries. An ordinary “tablet” will suffice, but other types of batteries can be used;
- "pocket" for the power supply;
Note! The best choice would be a "pocket" for the battery, made on an old motherboard.
- superbright diode;

Superbright diode for flashlight
- a button with which a homemade lamp will be turned on;
- glue.
Of the tools in this situation, you will need:
- glue gun;
- solder and soldering iron.
When all the materials and tools are collected, you can get to work:
- First, remove the battery pocket from the old motherboard. For this we need a soldering iron;
Note! Soldering the part should be done very carefully so as not to damage the contacts of the pocket in the process.
- the button to turn on the flashlight should be soldered to the positive pole of the pocket. Only after that, the leg of the LED will be soldered to it;
- the second leg of the diode must be soldered to the negative pole;
- the result is a simple electrical circuit. It will close when the button is pressed, which will lead to the glow of the light source;
- after assembling the circuit, install the battery and check its performance.

Finished lantern
If the circuit was assembled correctly, then when you press the button, the LED will light up. After checking, to increase the strength of the circuit, the electrical soldering of the contacts can be filled with hot glue. After that, we put the chains in the case (you can use it from an old flashlight) and use it to your health.
The advantage of this assembly method is the small dimensions of the lamp, which can easily fit in your pocket.
Second build option
Another way to make a homemade LED flashlight is to use an old fixture that has a burned out light bulb. In this case, you can also power the device with one battery. Here, the following scheme will be used for assembly:

Scheme for assembling a flashlight
Assembly according to this scheme is as follows:
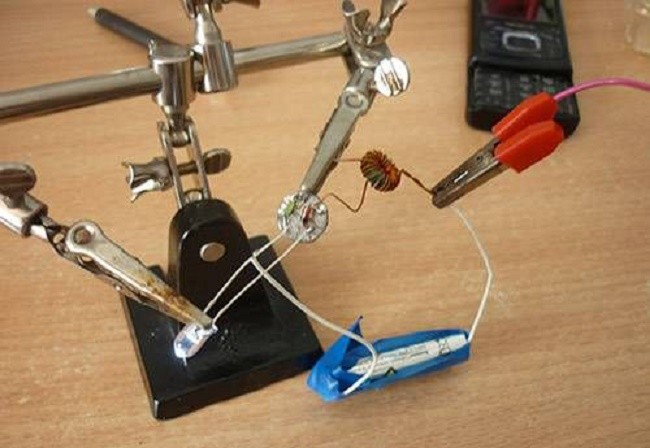
- we take a ferrite ring (it can be removed from a fluorescent lamp) and wind 10 turns of wire on it. The wire must have a cross section of 0.5-0.3 mm;
- after 10 turns have been wound, we make a branch or a loop and again winds 10 turns;

Wrapped Ferrite Ring
- further, according to the scheme, we connect a transformer, an LED, a battery (one finger battery will be enough) and a KT315 transistor. You can also put a capacitor for the brightness of the glow.

Assembled Circuit
If the diode does not shine, then it is necessary to change the polarity of the battery. If it didn’t help, then it was not the battery and you need to check the correct connection of the transistor and the light source. Now we supplement our scheme with the remaining details. The schema should now look like this:

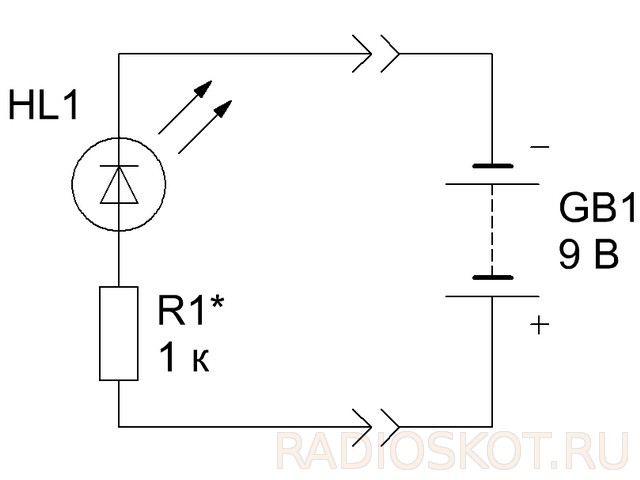
Scheme with additions
When capacitor C1 and diode VD1 are included in the circuit, the diode will begin to shine much brighter.

Diagram visualizations with additions
Now it only remains to choose a resistor. It is best to put a variable resistor of 1.5 kOhm. After that, you need to find the place where the LED will shine the brightest. Further, assembling a flashlight with one battery involves the following steps:
- now we disassemble the old lamp;
- from a narrow one-sided fiberglass we cut out a circle that should correspond to the diameter of the tube of the lighting device;
Note! Under the appropriate diameter of the tube, it is worth selecting all the details of the electrical circuit.

Fitted parts
- Next, we lay out the fee. After that, cut the foil with a knife and tin the board. To do this, the soldering iron must have a special tip. You can make it yourself by winding a wire 1-1.5 mm wide onto the end of the tool. The end of the wire must be sharpened and tinned. It should look something like this;

Prepared soldering iron tip
- solder the parts to the prepared board. It should look like this:

Finished board
- after that, we connect the soldered board with the original circuit and check its performance.
Schema health check
After checking, you need to solder all the details well. It is especially important to properly solder the LED. It is also worth paying attention to the contacts going to one battery. The result should be the following:

Board with soldered LED
Now it remains only to insert everything into the flashlight. After that, the edges of the board can be varnished.

Ready-made LED flashlight
Such a flashlight can be powered even from a single discharged battery.
Varieties of assembly schemes
In order to assemble an LED flashlight with your own hands, you can use a wide variety of schemes and assembly options. By choosing the right scheme, you can even make a flashing lighting fixture. In such a situation, a special flashing LED should be used. Such circuits usually include transistors and several diodes that are connected to various power sources, including batteries.
There are options for assembling a manual diode lamp, when you can do without batteries at all. For example, in such a situation, you can use the following scheme:

As a rule, from electric lamps it is desirable to obtain the maximum brightness of the glow. However, sometimes lighting is required that will minimally disrupt vision adaptation to darkness. As you know, the human eye can change its photosensitivity over a fairly wide range. This allows, on the one hand, to see at dusk and in poor light, and on the other hand, not to go blind on a bright sunny day. If at night you go out of a well-lit room into the street, then for the first moments almost nothing will be visible, but gradually your eyes will adapt to new conditions. Full adaptation of vision to the dark takes about one hour, after which the eye reaches its maximum sensitivity, which is 200 thousand times higher than daylight. In such conditions, even short-term exposure to bright light (turning on a flashlight, car headlights) greatly reduces the sensitivity of the eyes. However, even with full adaptation to the dark, it may be necessary, for example, to read a map, illuminate the scale of the device, and the like, and this requires artificial lighting. Therefore, lovers of astronomy, as well as anyone who needs to consider something in poor lighting conditions, do not need a bright flashlight.
In the manufacture of an astronomical lantern, one should not strive for excessive miniaturization. The body of an astronomical flashlight should be light and large enough so that in poor lighting conditions it can be easily found (otherwise you will drop it under your feet and look for a flashlight for half an hour). A road soap dish was used as a case. Switches should be such that they can be easily operated by touch and with gloves.


The eye is maximally sensitive to light from a long wavelength of 550 nm (green light), and in the dark, the maximum sensitivity of the eye shifts towards short wavelengths up to 510 nm (effect Purkinje). Therefore, it is preferable to use red LEDs in an astronomical lantern, and not blue, or even more so green. To red light, the sensitivity of the eyes is less, which means that red lighting will less disrupt adaptation to the dark.
In addition to the main lantern, you can make several simple beacons to illuminate various objects. The fact is that few astronomy lovers can afford to have a full-fledged amateur observatory. Most are watching from the balcony. And in a tight space, and even in the dark, you can easily catch your foot and fill up the tripod of a telescope or camera. In addition, suddenly meet in the dark knee with the corner of a drawer or bedside table, the same pleasure is small. Therefore, it is advisable to use the simplest mini flashlights to illuminate tripod legs, sharp corners of furniture, shelves with accessories, and so on. In principle, just an LED fixed with adhesive tape on a 3 V battery of the type 2032 or similar. But, firstly, without a current-limiting resistor, the LED glow is too bright, and secondly, it is desirable to have a switch even in the simplest flashlight. Guided by these considerations, several such beacons were made.

A reed switch paired with a magnet is used as a switch. The 3 V battery mount is self-made. A current-limiting resistor is switched on in series with the LED, its value must be selected so that in the dark, with a direct look at the LED lens, the light does not blind the eyes even at close range. In different beacons, you can use LEDs of different colors to facilitate identification, while remembering that the eye does not have the same sensitivity to light with different wavelengths. You can use flashing LEDs.


In addition, a couple more designs of simple LED lights. The structures specifically described below were not intended for astronomical purposes, but they can easily be adapted for such use.
A simple waterproof flashlight can be made from a film can. We will need: a new jar of film, a 3 V LED, 2-3 reed switches, a 3 V lithium battery 2032 , cotton wool (case filler), a block for a battery from an old flashlight. To ensure water resistance, it is necessary that there are no holes in the body of the flashlight. So as a switch, you can use sealed contacts. For reliable operation, it is better to take 2-3 reed switches, since when turning along the longitudinal axis, the sensitivity of the reed switch changes. So, we collect a flashlight according to the scheme.

We bend the wires so that everything fits in the case, I filled the empty space with cotton so that nothing dangles. We place the circuit in the case. It is important that the film jar is new, i.e. so that the lid closes as tightly as possible. Any magnet will work as a switch. The flashlight of this design continued to work after 10 hours in the water. The cotton wool remained dry. So, long-term lying in a puddle will not damage such a device.


Surely radio amateurs have pads from failed 9 V batteries of the Krona type. On the basis of such a block, you can assemble a simple flashlight that does not actually need a body. An LED is connected to the contacts of the block through a current-limiting resistor.
Outside, the LED and resistor are wrapped with several layers of insulating tape. In the position put on the battery, the flashlight forms a single unit with it.


Thus, it is possible to adapt almost any suitable case and battery for a homemade flashlight, although below 3.5 V you will already need to install LEDs. Thank you for your attention. Author Denev.
Discuss the article LED FLASHLIGHTS WITH YOUR HANDS
Somehow I ordered SMD 5630 LEDs from China for a future robot, which I have been assembling for half a year, and now there are a lot of diodes, a whole bay, and the surplus must be used somewhere 🙂 I decided to assemble a backlight for the door at the entrance to the house. Having started experimenting, it turned out that you can make good flashlights for lighting in various places in the house, and most importantly, everything can be made from improvised materials! 🙂
The first step is to collect the necessary materials, namely:
- A lid from kefir or milk - the basis of the flashlight body
- SMD 5630 or 5730 LEDs
- Resistors 3.3 - 12 ohms (depending on power supply)
- Mounting or PCB
- wires
- Plexiglas - as case cover
- 3.7 Volt battery or 5 Volt power supply
In this article, I used SMD 5630 LEDs with an operating voltage of 3.3 Volts and a current of 150 milliamps. The power source is a cell phone battery with a capacity of 5000 mAh and a voltage of 3.8 volts. At this voltage, 3.3 Ohm resistors are needed, but in the absence of these, 2.2 Ohm had to be used.

When the battery is discharged, its voltage drops and generally does not exceed 3.6 volts, which is consistent with the resistance rating of 2.2 ohms.
A small piece of circuit board is suitable for mounting LEDs and resistors.

We solder diodes, resistors and power wires according to the diagram.

The diagram shows the resistor values for 3.7 and 5 Volts. For a brighter glow, you can add additional LEDs - 3, 4 or more pieces, depending on the size of the housing cover and the required brightness.

After that, you should check the operability of the circuit by applying power to the appropriate wires.

Now you can fix the board in the cover with hot glue.

We pass the wires through the side opening of the cover, also fixing them with hot glue.

Now we fix the transparent plexiglass cover with the help of second super glue.

I cut out the cover using a 44 mm crown and a screwdriver from a sheet of plexiglass.

Apply glue to the edges of the glass. It can be dots, or it can be a solid line.

Firmly press the body of the flashlight and hold for a few seconds.

Lid in place. The flashlight is almost ready.

The hole in the center of the flashlight, obtained by drilling a circle of plexiglass, can be closed with a furniture plug.

The body of the flashlight is ready. If desired, you can sand the plexiglass with sandpaper to obtain a matte surface. In the photo below, on the left, a flashlight with transparent glass, and on the right, with a matte glass obtained with sandpaper.

Connect both flashlights to a power source.

This is what the finished product looks like.

The brightness of such lanterns is enough to illuminate the whole room.

For example, you can make a backlight on a bookshelf.

Or on the shelf with clothes in the closet.
An LED is a semiconductor device that converts electrical current into light. One 220 volt LED lamp saves a huge amount of electricity. Savings come out 2 times more than a fluorescent lamp and 10 times than an incandescent lamp. If you use parts from a burned-out lamp to make such a lamp, you can significantly reduce costs. Do-it-yourself LED lamp can be assembled quite simply. But do not forget that for this you must have the appropriate qualifications, as you will have to work with high voltage.
Benefits of LEDs
Nowadays, you can find a huge number of types of chandeliers with LED lamps in stores. They have different advantages and disadvantages. Modernization of energy saving lamps allows you to take advantage of all the benefits of fluorescent light. This applies to the most common fixtures with an E 27 base. And the old representatives of this family were endowed with an unpleasant flicker. Fluorescent light sources are truly a miracle. Compared to them, incandescent lamps are losing ground very much. Their high power consumption and low light output are not offset by their high color rendering index.
Durability is their main advantage. It is mechanically strong and reliable.. It is known that its life can reach up to 100,000 hours. And they are also considered environmentally friendly light sources, unlike fluorescent lamps, which, in turn, contain mercury. But as you know, fluorescent lamps have some disadvantages:
- The vapors contained in the tubes are quite poisonous.
- Due to frequent switching on and off, they can quickly fail.
- The design itself requires a certain amount of recycling.

In order to remove this small minus and turn it into a good plus, you can build a lamp from an LED strip with your own hands. In this way, the cost of the light source can be reduced. It will be much lower than that of luminescent counterparts . Also, this lamp will have several advantages:
- Lamp life will be a record 100,000 hours, but only if properly assembled.
- The cost of a homemade device is no higher than that of a fluorescent lamp.
- The watt/lumen efficiency is far superior to all analogues.
But there is also one drawback - this product does not have a warranty. It must be compensated by the skill of the electrician and the exact observance of the instructions.
Homemade lamps
To create a lamp with your own hands, there are a huge number of ways. Using an old base from a burned-out fluorescent lamp is the most common method. Such resources are available in every home, so there will be no problems finding them. And you will also need:

In some schemes, one or two items from this list may not be useful. However, in others, on the contrary, new links in the chain may be needed, for example: drivers or electrolytes. In each specific case, you need make a list of required materials.
How to make a DIY LED lamp
 To proceed with the installation of the lamp, it is necessary to prepare two damaged fluorescent lamps with a power of 13 W and a length of half a meter. There is no point in buying new ones, it is best to find broken old ones. But they must be checked for cracks and chips.
Next, in the store you need to purchase an LED strip. This must be approached responsibly, as the choice is very large. Ribbons with natural or pure white light work best. Since they do not change the shades of surrounding objects and are super-bright. Usually in these tapes the LEDs are assembled in groups of three. The power of one group is 14 watts, and the voltage is 12 volts per meter tape.
After that, you need to disassemble the fluorescent lamps into their component parts. It is necessary to act very carefully - do not damage the wires and do not break the tube, as in this case toxic fumes will escape. All extracted entrails should not be thrown away. They may come in handy later. Next, you need to cut the tape into sections of 3 diodes. After that, it is worth getting expensive and unnecessary converters. Large, sturdy scissors or wire cutters are best for cutting the tape.
 As a result, there should be 22 groups 3 leds or 66 leds, which must be connected in parallel along the entire length. To convert alternating current to direct current, it is necessary to increase the standard voltage of 220 volts to 250 in the electrical network. This is due to the straightening process. The next step is to figure out the number of LED sections. To do this, you need to divide 250 volts by 12 volts (voltage for 1 group of 3 pcs.). Having received as a result 20.8 (3), you need to round up - you get 21 groups. It is best to add another group, as the total number of LEDs will be divided into two lamps. And dividing an even number is much easier.
Next, you need a DC rectifier, which can be found in the extracted insides of a fluorescent lamp. Using wire cutters, we remove the capacitor from the common converter circuit. It is quite easy to perform this action, since it is separate from the diodes, you just have to break off the board.
 Using superglue and soldering, it is necessary to assemble the entire structure. You should not try to fit all 22 sections into one lamp. As mentioned above, you need to find 2 half-meter lamps, since it is simply impossible to place all the LEDs in one. You do not need to rely on the self-adhesive layer, which is located on the back of the tape. He won't be able to last long. Therefore, to fix the LEDs, it is better to use superglue or liquid nails.
Summing up, you can make out all the advantages of the assembled product. The amount of light from the resulting lamps is 1.5 times greater than that of analogues. But the power consumption is much less than that of fluorescent lamps. The service life of this light source will be about 10 times longer. And also one of the advantages - is the direction of the light. It is directed strictly downward and does not have the ability to dissipate. Therefore, it will be best used at the desktop or in the kitchen. However, the emitted light is not high brightness, but has low power consumption.
Constant use of the lamp in the on state will consume only 4 kW of energy per year. The cost of electricity consumed per year can be compared with the cost of a ticket in public transport. Therefore, such light sources are often used where constant illumination is required, for example:
- Street.
- Corridor.
- Utility room.
- Emergency lighting.
Simple LED light bulb
There is another way to create a lamp. A table lamp, chandelier or lantern needs an E14 or E27 socket. Accordingly, the diodes used and the circuit will be different. Compact fluorescent lamps are now common . For installation you will need one burned out cartridge, as well as a modified list of materials. Necessary:

Let's move on to creating an LED module with our own hands. First you need to disassemble the old lamp. In fluorescent lamps, the base is attached to a plate with tubes and secured with latches. The plinth can be detached quite simply. It is necessary, having found places with latches, pry them with a screwdriver. You need to do everything quite carefully so as not to damage the tubes. When opening, it is necessary to ensure that the electrical wiring that leads to the base remains intact.
From the upper part with gas discharge tubes, you need to make a plate to which the LEDs will be attached. To do this, disconnect the bulb tubes. The rest of the plate has 6 holes. In order for the LEDs to fit tightly in it, you need to make a cardboard or plastic “bottom” that will also isolate the LEDs. You need to use NK6 LEDs, they are multi-chip (6 crystals per diode) with parallel connection.
Because of this, the light source is ultra-bright at minimum power. In the cover you need to make 2 holes for each LED. Holes should be pierced carefully and evenly so that their location matches each other and the intended pattern. If you use a piece of plastic as a “bottom”, then the LEDs will be fixed firmly. But in the case of using a piece of cardboard, you will need to glue the base with LEDs using superglue or liquid nails.
 Since the light bulb will be used on a 220 volt network, an RLD2-1 driver is required. You can connect 3 diodes of 1 watt to it. For this lamp, it took 6 LEDs with a power of 0.5 watts. From this it follows that the connection circuit will be formed from two parts connected in series from three LEDs connected in parallel.
Before proceeding with the assembly, you need to isolate the driver and the board from each other. To do this, you can use a piece of cardboard or plastic. This will avoid a short circuit in the future. There is no need to worry about overheating, as the lamp does not heat up at all. It remains to assemble the design and test it in action. The white light makes the bulb appear much brighter. The luminous flux of the assembled lamp is 100-120 lumens. This may be enough to illuminate a small room (corridor or utility room).
Types of fixtures
Lamps on LEDs can be divided into two groups: indicator (LED) - are used as indicators, because they are low-power and dim. The green lights on the router are indicator LEDs. Such diodes are also on the TV. Their application is quite varied. For example:
- Car dashboard lighting.
- Various electronic devices.
- Illumination of computer displays.
 Their colors have a huge variety: yellow, green, red, purple, blue, white and even ultraviolet. It is worth remembering that the color of the LED does not depend on the color of the plastic. It is determined by the type of semiconductor material from which it is made. In most cases, you need to turn it on to know the color, as they are made of colorless plastic.
A lighting design is used to illuminate something. It differs in its power and brightness. It also has a very reduced price, so it is often used in domestic and industrial lighting. This type of lighting is considered productive, environmentally friendly and cheap. To date, the level of development of technology can allow the production of lamps with a high level of light output per 1 watt.

