16.10.2023
Editing a custom field 1s. A simple example of using custom fields in a DCS report. String Operations
Each organization, in order to make timely and correct management decisions, needs operational information about the availability of goods in warehouses, its cost, and sales. Trade organizations work with a large number of items and counterparties, and this requires good setup of analytical accounting and quick acquisition of the required information from its data. The article discusses the basic techniques for working with standard reports in the standard solution “1C: Trade Management 8” (edition 11), built on the basis of a data composition system, and provides useful practical recommendations that will be useful to both novice users and those who have switched to the new edition from previous editions.
For example, let's take the report
- Product availability analysis;
Settings.
In a collumn Type of comparison Nomenclature
- Equals
- Not equal
- On the list
- Not on the list
- In Group Nomenclature;
- Not in group Nomenclature;
- In a group from the list Nomenclature;
- Not in a group from the list Nomenclature.
Meaning
"Quick selections"
As the 1C:Enterprise 8 platform develops and the new version 8.2 appears, reports in systems become more flexible, and users have more and more opportunities to customize them to their requirements without the help of programmers.
New opportunities provided by the data composition system (DCS) allow you to experience the benefits of 1C:Enterprise 8 capabilities when creating reports like never before. And, despite the fact that the report interface has undergone significant changes (compared to edition 10.3 of the “Trade Management” configuration, hereinafter referred to as UT), the report settings are still available to the average user. Let's look at some basic techniques for working with them.
The first thing you can pay attention to is the quick selections. They allow you to display data in a report based on certain values of report fields according to the user’s wishes.
For example, let's take the report Analysis of product availability in UT. Let us immediately note that the entire demonstration of the reporting capabilities in UT 11 will take place using the example of two reports:
- Product availability analysis;
- Revenue and cost of sales.
Selection by some fields can be done either directly in the report form or using a button Settings.
In a collumn Type of comparison the user can select different comparison conditions. For example, for the field Nomenclature You can select the following types of comparison:
- Equals- the report will be built only for the selected item;
- Not equal- the report will be generated for the entire product range, except for the selected item;
- On the list- the report will be based on a list of item items;
- Not on the list- the report will be built on the entire product range, except for selected items;
- In Group- the report will be built on the entire item located in the selected directory folder Nomenclature;
- Not in group- the report will be built on the entire product range, except for items located in the selected directory folder Nomenclature;
- In a group from the list- similar to comparison In the list, only folders in the directory are selected as list values Nomenclature;
- Not in a group from the list- similar to comparison Not in the list, only folders in the directory are selected as list values Nomenclature.
The checkbox to the left of the selection field indicates that selection for this field is “enabled,” i.e., is taken into account by the report.
Unchecked fields are not taken into account even if you have selected specific values for those fields.
Depending on the selected type of comparison in the column Meaning a specific element or folder (group) of the directory, or a list of elements or folders is indicated.
“Quick selections” are available in all solutions on the 1C:Enterprise 8 platform.
An example of a simple change in report settings
To view/change report settings, you need to go to the menu All actions - Change option.
The settings window for the selected report option opens in front of us.
The report structure is displayed at the top of the window. In essence, this is a visual display of the groupings of rows and columns of the report, i.e. in what order the analytics data will be displayed in the report in rows and columns.
At the bottom of the window, information related to the report as a whole is displayed (if the top level is selected in the report structure Report), or to a specific grouping of rows or columns of the report (if a grouping at a lower level is selected), settings for displaying information and designing fields.
Example 1
Step 1. We need to remove the grouping by product characteristics, leaving only the grouping by product. To do this, at the top of the report settings window, click on the field Nomenclature, Characteristics. At the bottom of the window, go to the tab Groups.
Select the field Characteristic and click on the button Delete command panel.
Confirm changes to the report settings by clicking the button Finish editing in the lower left corner of the screen.
Step 2. After removing the characteristic, our task, according to the conditions of the example, will be to add a price group. In essence, this grouping should be at a level lower than the grouping by warehouse, but at a level higher than the grouping by item. Therefore, in the structure of the report we will highlight a grouping Stock.
By right-clicking on it, select the command from the context menu New group.
In the grouping field editing window that opens, select Nomenclature.Price group.
By clicking the button OK, we will see that a new grouping has been added to the report, subordinate to the grouping Stock.
Now let’s select the grouping by product and, without releasing the right mouse button, drag it inside (i.e. below) the grouping by price group. We will get the structure presented in Figure 1. The result of setting up the report is presented in Figure 2.
Rice. 1. The resulting report structure
Rice. 2. Result of report customization
Working with custom fields
Let's now take a closer look at the new options for customizing reports in the 1C: Trade Management 8 program.
In the form of editing the structure and settings of our report, let’s pay attention to the tab Custom fields.
Previously, we added fields to the report, the list of which was pre-specified by the developer. Using this tab, we can create our own fields that we need - Selection field or Expression field.
Example 2
|
Let’s customize the “Sales History” report (option of the “Revenue and Cost of Sales” report). We will display sales data by partners and product range. Let's assume that our company sells goods in Moscow and in the regions. Thus, each client in the information base belongs to a specific geographic region (the “Business Region” attribute in the “Partners” directory). We can easily group sales data in a report by region, but what if we are interested in more aggregated statistics, in particular, the answer to the question “How many goods were sold in Moscow, and how many in all other regions combined”? This is where “custom fields” come in handy. |
Step 1. Let's open the report. Let's go to the form for setting up the report structure ( All actions -> Change option). Let’s delete in turn all the groups previously created in the report - to do this, select each of them and click on the button Delete command panel, or use the DEL key.
Just as in the previous example, let's add a grouping to the report by partner, and then by item. We already know how to do this, so it won’t take much time.
Step 2. Let's create a new custom field. Let's open the bookmark Custom fields and execute the command Add -> New Select Field.
Let's give our new field a name - Region in general.
Let's click on the button Add. In a new line, click on the button in the column Selection. In the selection editing form that appears, add selection by field Partner.Business region. Let's choose the type of comparison Equals, meaning - Moscow.
Let's click on the button OK, after which we will return to the custom field editing window. Next, you need to click on the button in the column Meaning and in the data type selection list that appears, select Line and write as value Moscow.
Let's repeat the operation. Let's add one more row to the table. This time for selection by field Partner.Business region choose the type of comparison Not equal.
Returning to the custom field editing window, in the column Meaning let's write Other regions(see Fig. 3).
Rice. 3. Editing a custom field
Let's click on the button OK. Our new field is ready.
Step 3. Let's add our new field to the report structure. Selecting the top level with the mouse Report in structure, add a new grouping. In props Field let's choose Region in general.
Let’s drag the grouping by partner and the subordinate grouping by item inside the newly created one with the mouse.
Let's generate a report and look at the result (shown in Fig. 4).
Rice. 4. Result of report generation
Selection and sorting
Let's return to the window for editing the report structure and settings and pay attention to the bookmarks Selection And Sorting.
If the root element is selected in the report structure ( Report), then the settings made on these tabs will apply to the entire report as a whole. If a report grouping is selected, the settings will affect only that grouping.
Example 3
As a result, the report Sales history Only those implementations where the manager is specified will be included. Ivanov Ivan Fedorovich.
Example 4
Save the changes made
If you change the report structure, you can always save it using the command All actions -> Save option.
In the form for saving an option, you can use the switch to select Save to existing report version(instead of one of the already available options), or Save new report version.
We examined in some detail the settings of reports implemented on the basis of the access control system. Now let's look at more subtle and detailed settings for report options. The window for “advanced” settings of the report option is called by the command “More” - “Other” - “Change report option”.
The window for changing the report version is divided into two parts:
1. Report structure.
2. Report settings.

The report option structure section is similar to the “Structure” tab of the standard report settings. The purpose and configuration of groupings is discussed in detail in Part 1 of the article.
The report variant structure table, in addition to the actual column with groupings, contains several additional columns:
The report option settings section gives the user ample opportunities to configure the report to suit their needs. It almost completely coincides with the standard report settings discussed in Part 1. Let’s look at all the tabs of the section and note the differences.
The settings section consists of the following tabs:
1. Parameters. Contains ACS parameters available to the user.
The SKD parameter is a value used to obtain report data. This can be a condition value for selecting or checking data, as well as an auxiliary value.

The parameter table is presented in the “Parameter” - “Value” format. If necessary, you can change the parameter values. Clicking the “Custom Settings Element Properties” button opens the custom settings of the element.

In this window, you can select whether the element will be included in the user settings (that is, visible to the user when setting up a report), set the element's presentation and editing mode (quick access in the report header, normal in the report settings, and inaccessible).
Custom settings item properties also have groupable fields, margins, selections, and conditional appearance elements.
2. Custom fields. Contains fields that are generated by the user himself based on the data selected by the report.

The user can add two types of fields:
- New selection field...
- New expression field...
Selection fields allow you to calculate a value based on a given condition. The selection field editing window contains a field title and a table in which the selection, value and presentation of the field are specified. Selection is a condition, depending on which the desired value will be substituted.

For example, let's calculate an estimate of the number of sales. We will assume that if less than 10 units of a product are sold, we sold a little, and if more than 10 units, we sold a lot. To do this, we will set 2 values for the calculated field: the first will be with the selection “Number of goods Less than or equal to “10””, the second with the selection “Number of goods Greater than “10””.
Expression fields allow you to calculate a value using arbitrary algorithms. They can use the functions of the query language and the built-in 1C programming language. The expression field editing window contains two fields for expressions of detailed and summary records. Total records are groupings configured in the “Report Structure” area; they must use aggregate functions (“Sum”, “Minimum”, “Maximum”, “Quantity”).

For example, let's calculate the average discount percentage. The average discount percentage is calculated using the formula: [Sales amount without discount] - [Sales amount with discount] / [Sales amount without discount]. It is important to remember that the sales amount without a discount may be zero, so we use the SELECT operator to check. We get the following expressions:
· For detailed entries:
Choice
When [Sales amount without discount] = 0
Then 0
Otherwise [Sales amount without discount] - [Sales amount with discount] / [Sales amount without discount]
End
· For summary records:
Choice
When Amount([Sales amount without discount]) = 0
Then 0
Otherwise Sum([Sales amount without discount]) - Sum([Sales amount with discount]) / Sum([Sales amount without discount])
End
As mentioned earlier, in the expression of total records we use the aggregate function “Sum”.
3. Groupable fields. Contains fields by which the results of the report variant will be grouped. Grouped fields are configured separately for each grouping, but you can set general grouped fields for a report option if you select the “Report” root in the structure tree. You can add a field from the report result, a custom field, or select an auto field, then the system will select the fields automatically. This tab also allows you to change the order of grouped fields.

4. Fields. Contains the fields that will be output as a result of the report variant. Fields are configured separately for each grouping, but you can set common fields for a report option if you select the root “Report” in the structure tree. You can add a field from the report result, a custom field, or select an auto field, then the system will select the fields automatically. This tab also allows you to change the order of the fields.
Fields can be grouped to logically highlight any part of the report or to specify a special arrangement of columns. When adding a group, the “Location” column becomes active and allows you to select one of the location options:
- Auto - the system places fields automatically;
- Horizontal - fields are positioned horizontally;
- Vertical - fields are arranged vertically;
- In a separate column - fields are located in different columns;
- Together - the fields are located in one column.

5. Selection. Contains selections used in the report variant. Setting up selections was discussed in detail in part 1 of this article. Filters are configured separately for each grouping, but you can set general filters for a report option if you select the root “Report” in the structure tree.

6. Sorting. Contains the sort fields used in the report variant. Setting up sort fields was discussed in detail in Part 1 of this article. Sorting is configured separately for each grouping, but you can set general sorting fields for a report option if you select the root “Report” in the structure tree.

7. Conditional registration. Contains conditional design elements used in the report variant. Setting up conditional appearance was discussed in detail in Part 1 of this article. Conditional appearance is configured separately for each grouping, but you can set general elements of conditional appearance for a report option if you select the root “Report” in the structure tree.

8. Additional settings. Contains additional report design settings. Allows you to select the general appearance of the report, the location of fields, groupings, details, resources, totals, set chart settings, control the display of the title, parameters and selection, determine the position of resources and fix the header and grouping columns of the report version.

In conclusion, I would like to note that report settings can not only be saved as a report option, but also uploaded to a file (menu “More” - “Save settings”). To download, you must select “Load settings” and select the saved file. Thus, we can transfer report variant settings between different databases that have the same configuration.

Based on this, we can summarize that the user can not only independently customize the report to suit his needs, but also save his settings and use them in the future if necessary.
The report receives the balances of goods in warehouses in various sections (characteristics, series, units of measurement, etc.). In order not to complicate the example, we will leave only grouping by item and displaying only the final balance as of the reporting date. The final table will show the balances of the item in the warehouses.
But then the user reported that he needed to add two additional fields:
- Quantity alert. If the quantity is less than or equal to 5, then the alert is "Insufficient". If the quantity is greater than 5, then less than or equal to 10, then the alert is “Normal”. If the quantity is more than 10, then “Overabundance”.
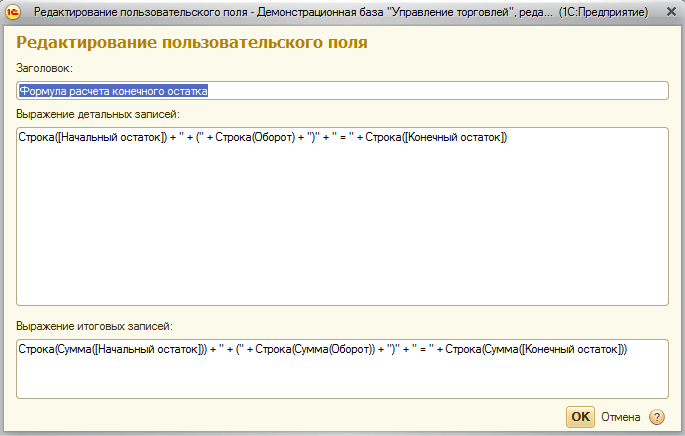
- Formula for calculating the final balance. In the additional column, the user wants to see what actions the program performed to obtain the final balance value. That is, the formula “Initial balance + Turnover = Final balance”, where the corresponding values will be substituted.
Of course, a programmer could intervene here and change the data composition scheme request and report settings, but we will complete the task in user mode without changing the report in configurator mode.
Additional fields
So, let's get started. Let's go to the report option settings:

The settings designer for the ACS report option will open in front of us. By going to the "Custom Fields" tab, we'll start creating them.

The screenshot already shows two created custom fields, the functionality of which was described above. Let's look at the settings for each. Let's start with the "Notification" field.

In the settings, we need to set the field title that will be displayed in the report, as well as set expressions for generating the value in the detailed records field and in the totals for this field. Since there is no need to show the alert in the totals, we will write an expression only for detailed records.
The expression syntax is similar to the 1C:Enterprise query language. There are some differences, but we will not touch on them in detail in this article. The expression uses the selection operator:
"Choice When Then Otherwise The End"
similar to an operator in a query language. Fields in custom field expressions are specified by their representation. In order for the platform to understand that the entered view represents a certain field, the view name is surrounded by square brackets "". If the field representation is one word, then the square brackets are optional. In the example above, we are looking at the Ending Balance field.
The settings for the "Formula for calculating the final balance" field are set in the same way:
Here it is necessary to mention some nuances:
- We can only show the formula in a cell as a line. Therefore, we convert all numeric values to a string using the SKD expression language method “String()”, which converts any value to a string. Then we perform string concatenation.
- In order for the field to be displayed in the report totals, we will add a similar formula to the expression of the total records. You just need to add aggregation functions "SUM()" for each value in accordance with the totals.
You're ready to use fields in your report!
Setting up and generating a report
Add the "Formula for calculating the final balance" field to the output fields of the report:

We will add the expression “Notification” to detailed item records. To do this, add the expression field “Notification” to the “Nomenclature” grouping. After this, the report structure will take the following form:

The report setup is now complete. If necessary, the added settings can be saved for reuse. Let's generate a report:

As we can see, fields have been added to the report in accordance with the conditions of the task. At the same time, there was no need to modify the report in configurator mode. This is the main advantage of custom fields! A user trained to use them can use them to create a report on their requirements in-house, without the assistance of a programmer.
Believe me, it is possible to train him to use these features, because it is much easier than writing formulas in Excel spreadsheets.
For competent management, any trading organization needs prompt receipt of information about the current state of goods, sales, and profits. However, if we consider that organizations often work with a wide range of goods and a large number of counterparties, then the analytical report customization tool plays an important role in obtaining the necessary information. Let's take a closer look at how to work with custom fields in standard program reports (rev. 11).
The development of the 1C: Enterprise 8 platform offers users more and more opportunities. For example, in version 8.2, reports became more flexible, allowing them to be customized to suit various requirements without the help of qualified programmers.
Changing report settings
To view or change report settings, go to the “All actions” menu and select the “Change option” command. After this, a window with settings for the open report opens in front of the user.
In the upper part of the settings window, you can see the structure of the report, which is nothing more than a visual reflection of the report columns and groupings of its rows, which essentially makes it possible to imagine the order in which analytical data is displayed in this report.
At the bottom of the settings window, the actual information and field settings are displayed, relating either to the report or to the elements of its structure (columns and row groupings).
Custom fields
In a programme 1C: Trade Management 8 Edition 11 report settings provide users with more options in their generation.
In the window for editing settings and report structure, we would like to draw users’ special attention to the “Custom Fields” tab, which allows you to create your own fields and add them to the report. It should be recalled that previously the user could only use those fields that were implemented by the developer.
Let's look at the use of this function using an example.
Let’s assume that the head of a trading company that sells goods in Moscow and the regions wants to customize the “Sales History” report to his requirements, wanting to display in it data on the sale of products in Moscow and the regions in general, as well as to partners. This is very easy to do using custom fields.
Thus, a clear example shows that flexible settings for custom fields in a standard program 1C: Trade Management 8 provide the user with ample opportunities to customize reports, allowing them to quickly obtain the necessary information in a convenient form.

