21.04.2020
How to make a scarecrow out of paper. About how to make a scarecrow-spichkochtrel! The easiest way to make this device. Safety precautions for use
A matchstick from a clothespin was invented back in the days Soviet Union. He was also called "pugach" in the common people. Schoolboys gladly used this "weapon" in their battles. Due to the simplicity of design and components that are always available, the crossbow was very popular among students in the senior and junior classes. Everyone knew how to make a scarecrow. This device is compact, and you can shoot from it with both conventional and incendiary ammunition. It depends on individual desire. Although firing fire projectiles had more psychological impact because it also caused physical harm. The effectiveness of such a charge is negligible. Now this weapon has lost its former popularity. To a certain extent, this was influenced by the fact that now clothespins are mainly made of plastic, and wooden ones have a very weak spring. Yes, plus to this, the kids are now lazy and not particularly hardworking. But still there are still real connoisseurs of this uncomplicated weapon who would like to know the process of its manufacture. Here for them further it will be told about how to make a pugach with your own hands. In the hope that they will pass on this secret to others, as a result of this it will not be lost.
Fixture base
How to make a pugach from a clothespin - a children's weapon from the times of the Soviet Union? The answer to this question is quite simple. Some people still use wooden clothespins.
One of them can be taken as a basis in the manufacture of this throwing weapon, which can shoot with lit matches like a real military weapon.
improvised materials
In this case, the following is required:
- Clothespin made of wood.
- Rubber.
Tools
Here you will need:
- Penknife.
- Protective glasses.
Ammunition
In this regard, you can use:

Manufacturing process
Now let's move on to the question of how to make a homemade scarecrow.
For this you need:
Disassemble the clothespin itself into three parts. Namely: two halves of wood and a metal spring.

With the help you need to finalize both halves. It is not difficult to do this. First, you just need to cut a small groove on one of the wooden halves. Take your time, your fingers are much more valuable than any clothespin. Then divide the second half into two parts.

Then the spring must be pulled back to the specified groove. This must be done carefully. So that her protrusion enters this very gutter.
Then attach the short piece to the long piece. In order not to make a mistake during assembly, before making a scarecrow, be guided by the factory grooves. After everything fell into place, you need to fasten the elements with an elastic band. That's all. The pugach from the clothespin is ready.
Remember that the indicated wooden parts tightened with an elastic band should still move apart a little. That is, so much so that the upper part makes it possible to cock the spring.

Check for "combat readiness"
In the question of how to make a bugger, it should be taken into account that this device must be ready to fire. That is, you need to check. To do this, you need to perform the following steps:
- Pull the top forward. Until the protrusion of the spring is in the factory groove on its surface. When you achieve this, then pull this part back. Until the moment when the protrusion of the clothespin is in the groove you made at the bottom of the matchbox.
- Then select a projectile and load it by lifting the top part of this device. In this case, ordinary matches or metal paper clips are ideal.
- After that, pull back the spring so that the starting bar is released. This will result in a shot. That is, the device works.
Cause of malfunction
It may also be that the matchgun will not shoot. This may be due to the fact that another part of the spring is jumping out of place. Then you have to further deepen the groove into which it enters. This malfunction appears from the fact that the depth of the groove is not the right size.
Fixture upgrade
In the future, you can improve your scarecrow. To do this, glue a fragment to its lower part. matchbox containing sulfur. It's easy to do. After such an upgrade, the matches will light up when fired. This will add additional efficiency to this device. Also, part of the matchbox can be completely replaced with a piece of sandpaper. However, in this case, you will have to insert the matches into the pugach back to front. It won't be very convenient. This problem is much easier to solve by lighting matches before firing. In this case, do not neglect the danger posed by burning shells. Never use them indoors, do not shoot at flammable objects and it is advisable to wear them at the same time. And of course, in no case should you aim at people and animals. The matchgun is capable of shooting at a distance of up to five meters, and sometimes even further.
Conclusion
After reviewing the foregoing, everyone will be able to figure out the question of how to make a matchstick gunner. It is only necessary in this case desire, scrupulousness and diligence.
Difficulty level: Easy
1 step
1 We take the tube, measure 70 mm and bend it at an angle of 90 degrees (to get an L-shaped blank), the short end is flattened with a hammer.
2 step
2. We tightly drive the foil (shot) into the tube about 2 cm, i.e. there should be 5 cm of free hollow space.
3 step
3. We take a nail, measure the length one cm more than the length of the hollow space (the nail will serve as a striker for the charge, the piston method) and bend it at an angle of 90 degrees (L-shaped).
4 step
4. We charge. We take 2-3 matches, and crush the heads on the edge of the tube into the hole, ram it with our nail. We put the elastic band on the short edge of the tube and the nail closer to the edge. We pull the nail so that it catches on the fracture with the tube (the rubber band will press it). All is ready.
5 step
5. You can put it into action by throwing a scarecrow on the floor, hitting a surface with a nail head, or simply pressing an elastic band. There will be BOOM! :-)
- Most importantly, follow the safety precautions as with pyrotechnic devices: 1. Do not use near flammable objects. 2. Do not bring close to people. 3. Keep out minors. 4. Do not exceed the charge of match heads. 5. Do not use other flammable substances (gunpowder, etc.) 6. Observe etiquette. Where and how and with whom to use.
In those distant times, when our parents did not yet have such a variety of toys that today's children have, it was very hot topic make toys with your own hands. This article will look at how to create the legendary Pugach, which shoots just like a real gun, but without bullets. As a charge, sulfur from matches is used here, which detonates when a special striker hits it. Despite the fact that this is a children's pistol, it looks quite impressive and original, besides it is quite weighty, just like a real one.
These toys were very fashionable in the 80s and 70s.
The indisputable advantage of such a toy is that it is almost impossible to break it, since everything here is made of metal. The only thing required for the gun to work is matches. The pistol is safe when used carefully and is very easy to build.
Materials and tools for assembling a gun:
- an old bicycle chain;
- strong steel wire;
- soldering iron (or welding);
- a pair of rubber bands;
- nuts from bicycle spokes;
- bicycle spoke;
- hammer;
- screws with nuts and washers;
- pliers.


How the gun works:
There is an elastic band on the pistol, it activates the firing pin. Sulfur from ordinary matches is used as a charge. When fired, flames and smoke escape from the muzzle of a pistol, and a very loud sound of a shot is heard. You can not shoot with a pistol at animals and people if they are at a distance of less than 8 meters, as you can easily cause injury in the form of a burn or stun.

Pistol making process:
Step one. Creating the Body of the Gun
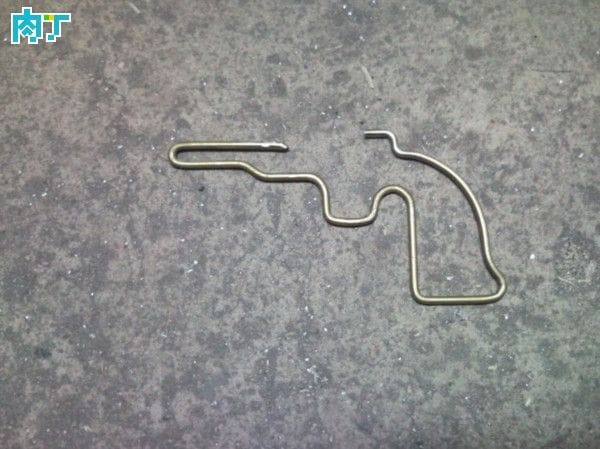
The main part of the pistol is made of strong steel wire; some authors also practice the manufacture of such pistols from thick aluminum wire. As you can see in the photo, here the author used welding in some places, and a soldering iron can also be used for connection. What needs to be connected is the axle that holds the "muzzle" and the body of the gun itself.
To work with wire, you can use pliers and a vise.
First, it is desirable to bend the frame of the pistol with your hands from a soft wire, and then make the pistol itself using it.


Step two. We make a "muzzle" for a gun
The muzzle, interestingly, is made of several links of a bicycle chain and consists of two parts. The nose can deviate on the axis to the right or left, this is necessary in order to load the gun with gray from a match. First you need to disassemble the chain and extract eight links from it (another number is possible). To do this, grind off the caps on one side of the chain, and then knock out the axles from them.


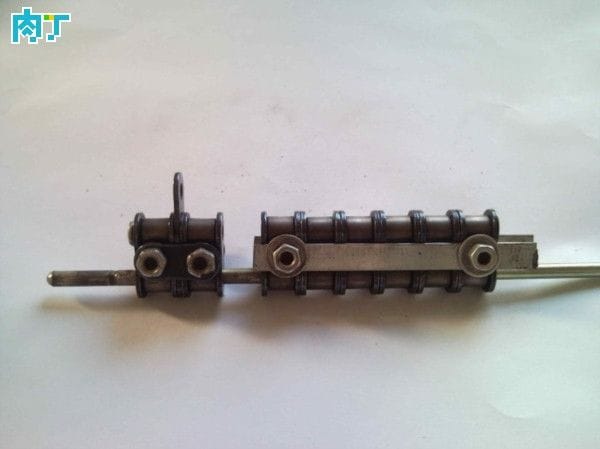
After that, you need to create two blocks from the chain links, the water block should have six links, and the other two. The bow will be the most important, it consists of two links, sulfur will be charged into it. To provide support for the striker, a nut from a bicycle spoke is driven into the front. As a result, the hole in the chain link will narrow, and the sulfur will detonate when the striker hits. When the gun explodes, fire and smoke will also come out of the muzzle of the gun.


The front two links are interconnected using bolts with nuts, as well as two parts from the same bicycle links. For the long part, you will need two pieces of metal with holes, they are also connected with bolts and nuts.
Also in the front part you need to fasten a loop for which the elastic band will cling. This loop is also made from part of the chain link.
Step three. Creating a hammer on a striker
The trigger is also made of wire, it is a hook with a loop at the end. When the trigger is pressed, the hammer loop is removed from the axis and a shot occurs. As for the drummer, you will need either welding or a soldering iron. What the drummer looks like can be seen in the photo. It is an axis with a loop at the end, with this loop the drummer is put on the axis when loading the pistol. Also on the drummer there is a special hook for which the elastic band clings. Well, in the very front part, a special handle is welded, which makes it easy to retract the drummer and thereby load the pistol.


Step four. Assembling the gun
The pistol is very easy to assemble. The manufactured link blocks must be installed on the axis and attached to the gun. The long block can be welded to the axle or soldered. As for the front, it must be movable in order to load the pistol. To do this, a thread will be needed at the end of the axis, but the block will be fixed with nuts and washers.


Now you can install the trigger and drummer. The trigger can be tied to the axis of the gun with an elastic band, this is the easiest way to attach it. Well, the striker is inserted into the block of links, and its loop is put on over the trigger loop. And finally, it remains to pull the elastic band, at one end it is attached to the nose of the pistol, and at the other to the striker. The rubber band must be powerful enough for detonation to occur.
Homemade pyrotechnic noise entertainment.
They existed in several varieties.
1. From a bicycle spoke. A spoke was removed from a bicycle wheel, always in its entirety, with a head that is attached to the wheel rim. I also needed a nail equal in diameter to the head. This nail, so as not to be lost, was tied by the hat to one end of the rope, which should be about a third less than length spokes, the other end of the rope was tied to the curved end of the spoke, with which she held on to the wheel axle. Matches were taken, sulfur was scraped off them. Then sulfur was loaded into the head at the end of the spoke, a nail was inserted into the head - the spoke bent and became like a bow for throwing arrows. The scarecrow was ready. He worked simply - it was necessary to hit a hard surface with an end with a nail with an effort. The result was a decent pop, much louder than the pop from the caps.
2. From a small tube, 10-15 centimeters long, about 5 mm in diameter. One end of the tube was bent at an angle of 90 degrees, its arm was 3-5 cm.
Then molten lead was poured into the tube so that even air would not pass from the bent tip. A nail was also taken, which would fit very tightly into this very tube, it was also bent from the side of the cap at the same angle and with the same shoulder size as that of the tube. Finally, an elastic band was needed, mainly from a bicycle chamber - it was put on the bent ends of the tube and the nail. Principle of operation: matches were taken, sulfur was scraped off from them, which was loaded into a tube. Then a nail was inserted, an elastic band was pulled. Then it was necessary to carefully pull the nail inside the tube and rest it against the inner wall. The device was cocked and ready to fire. If you squeeze it in your hand, pressing at the same time on the rubber band and the tube, then the nail slipped inward, hitting the sulfur with force, which is why the cotton occurred. In this device, the main thing was not to overdo it with the charge, otherwise it could burst in the hands. And some specially stuffed the pipe to the full with sulfur from matches, cocked and threw ...
3. From two large bolts and nuts. The bolts were fastened with a nut, and sulfur from matches was placed between them. The device had to be thrown with force by one of the bolt heads on a hard surface.
4. They found a hole in the asphalt, where they stuffed sulfur from matches. They put a nail on top and threw a brick on the structure.
5. From the details of the game "Crossroads". They took the keys to the clockwork machines of the game "Crossroads", 3-4 feathers from the tail of a pigeon, a nail (of such a diameter that it could tightly close the most voluminous part of the key) and a coil of wire. Feathers with the help of matches and electrical tape were attached to the narrow part of the key and served as a stabilizer. The nail was cut to a length of approximately 2 cm (it was necessary to leave the part with the cap) and attached to the key with the help of a wire-leash. Sometimes the key was weighted with pieces of lead. Sulfur was hammered into the most voluminous part, which was then closed with a nail with a hat (“strike”). Application: the pugach was thrown up or dropped from a height under the feet of the “victim” and worked when the nail head hit a hard surface.

