26.05.2019
Women's crocheted jacket with a round yoke. Sweatshirts with round yoke
The hot season is the best time to wear light blouses. And for those who like to knit, this is also a great opportunity create a new wardrobe item for yourself. Let's find out how to crochet an openwork blouse for the summer. And video lessons will help you better understand the technique of crocheting an openwork sweater.
What materials to choose
This bright blouse is suitable for older women. But if you use colors that are fashionable this season, perhaps young fashionistas will dare to wear it.
Necessary materials:
- Yarn - AUNT LIDIA (137 meters each) 100% mercerized cotton. The product shown in the photo took about 20 skeins.
- Hook No. 2.7
Jacket size: 52
How to crochet an openwork sweater
Knitting using these patterns will seem simple even for beginners. Non-false elements are easy to remember and, after a while, you will no longer look at the diagram.
Schemes for the main pattern:

Motif scheme:
Yoke pattern:
Detailed description:
First you need to cast on a chain of air loops with a margin of 30 cm. To calculate the required length, you need to take into account that the pattern is a multiple of 6 air loops, plus 2 edge air loops. Knit the first and second row with a single crochet, and then start knitting the pattern.
Since the photo shows a striped blouse, it is necessary to change the thread. But the thread was not changed in every row, as written in the description for the pattern, but after 1 front and 1 back row. This results in fewer ponytails. When cutting the thread, you need to leave a margin of about 15 cm; we will then use it to sew together the elements of the colored fabric.
This sweater can be sewn on the sides, or knitted in the round. If you knit in halves, there is less chance of making a mistake in the calculations. For example, if you need to knit items of size 54, then one half should be 54 cm wide. But when knitting the presented product, it narrowed to 48 cm. Therefore, I had to make the front part a little wider. To determine, you just need to add, we count: 54 - 48 = 6 cm. Now let’s determine how many repeats are in these 6 cm.
By applying a ruler to the finished canvas, we determine. In our case, 6 cm is 3 rapports. This means that when knitting the front you need to dial in three more repeats. Now the front will be 54 cm wide. But we need to compensate for the 6 cm that we lost when knitting the first half. Therefore, we will add 3 more rapports. In total, the front should be 6 rapports wider. We knit each half to the required length. For us it is 40 cm. We fasten the threads well. We sew both parts along the face, often making stitches over the edge. Carefully hem the tails of the threads along the wrong side. In this model we will not make any decreases for the armholes.
How to knit a round yoke
Now we will knit the top of the product.
According to the pattern we will knit a round yoke. Since this is a summer blouse, we will knit the yoke not at the neck, but so that the shoulders are slightly open. Let's cast on a chain of air loops with the calculation that the repeat is a multiple of 3 loops plus 1. Close the loops in a circle and knit 7 cm in a circle, according to the diagram.
An important point: when knitting a round yoke, you need to periodically lay it out on the table and make sure that there are no waves and that it does not tighten.
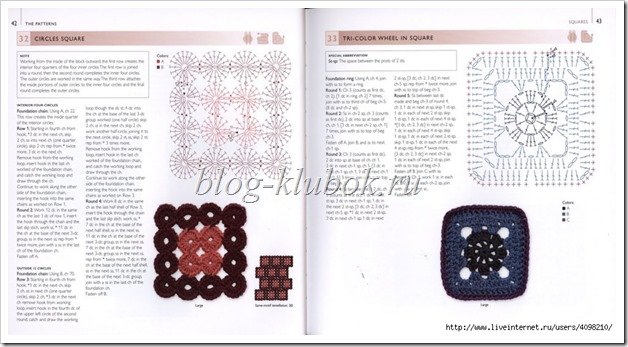
How to knit square motifs
- Idea. If the yoke stretches while being worn, then thanks to the double crochet, a matching satin ribbon can be attached to the round yoke. And then adjust the size.
- Secure with a pin in the center of the front and back. Divide the yoke into exactly 4 parts, and also mark these places with pins. Now we will combine one yoke pin with the center of the front, and also the back and yoke pins on the back side. Attach the yoke to the main part with pins in a circle and leave 15 cm for the arms. We sew the parts together using a lockstitch stitch, using matching threads. We will do stitches quite often.
- We will knit the last row of the yoke using square motifs. Their diagram is shown below.
- Having connected the square motifs, we sew them together and tuck the ends of the threads into the product. After this, we will sew the motifs to the yoke using sewing threads. Next, sew the yoke to the previously sewn back and front. Don't forget to leave 15 cm on the sides for each hand.
- After this, we will tie a single crochet around the place where the hands enter, and we will continue to knit the second row with the same threads, only we will make a “shell” pattern along the edge of the yoke. It is knitted like this: from one chain stitch we knit 5 double crochets. And along the edge of the main fabric we will tie it with a single crochet. Thread the end of the thread.
- The pattern in this product looks quite rich. Therefore, in our case, the edge is not decorated with “picot” or any other pattern. The edge of the main fabric is knitted with 2 rows of single crochet, the edge of the yoke - 1 row of double crochet. You can knit the product multi-colored or single-colored. In any case, you will be satisfied with the result.
Video tutorial on knitting a sweater with a round yoke
Here is another interesting option for knitted sweaters with a round yoke.
HOW TO CORRECTLY MAKE CALCULATIONS IN ORDER TO CARRY OUT A MODEL WITH A ROUND YOKETTE.
When making any product with any yoke shape, we need to build a pattern in full (or scaled) size, then apply the lines of our yoke to the pattern.
Then we need to take some measurements on the knitted sample with the selected pattern and on the existing pattern.
1. You need to know the volume of the yoke at the top - in cm and in the number of columns - pink line.
2. Know the volume of the yoke by its lower, wide edge - in cm and in the number of columns - green line.
3. Know the length of the yoke of the selected model in cm and in the repeats of the knitted pattern - the brown line.
Depends on:
a) by how many columns should each repeat of the yoke pattern be increased (expanded), in which rows of the repeat is it most convenient to make the necessary increases;
b) the yoke can be of any length from top to bottom, and depending on what pattern it is built on, it depends:
- with a narrow (short) yoke, will we finish all the details with raglan decreases towards the armholes;
- will we issue increases for the armholes themselves;
- are shortened rows needed at the transition to the main fabric, etc.
Example 1. Round yoke with front closure, sleeveless (drop shoulder)
Let's look at specific example, pattern and on a specific model.
Let's make a model with a dropped shoulder formed by the length of a round yoke, based on a standard pattern with a set-in sleeve for 48 size. Select a pattern and knit a sample. We make all calculations based on the pattern and knitted sample:
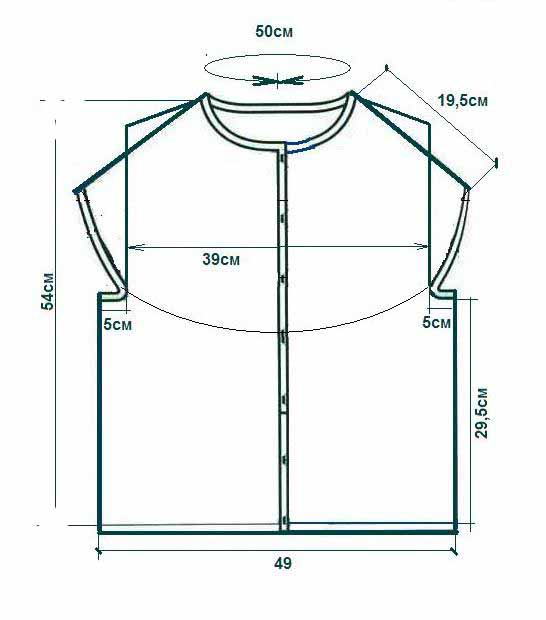
 In the 10x10 pattern we get 25.2 stitches and 12.2 rows. In one repeat - 6 stitches and 4 rows. Around the neck circumference of 50 cm, cast on 126 vp. +1, i.e., we dial 21 rapport. From calculations of the expansion of yokes, we know that the initial number of loops increases no more than 2.8 to three times, and the measurement of cm with tape around the body and lowered arms should be within 130 plus or minus 10 loops, we calculate to which we need to reach the number of columns in the rapport by expanding the yoke.
- measuring cm with tape according to the pattern gives 136-137cm, which according to the sample gives us (136x127p): 50cm = 345.4p. We typed 21 repeats, which means that we must reduce the resulting calculated number of loops to a multiple of 21:
345.4:21 = 16.5 loops = 17 loops in one repeat along the bottom of the yoke.
Let's take a closer look at our sample. With a repeat height of 4 rows and a yoke length of 19.5 cm, we need to knit 23 rows, adding evenly to the lines of the pattern.  Having knitted the yoke, we proceed to distribute the yoke into two shelves and a back. We have 21 rapports. If we traditionally divide into 3 parts - one for the front, the second for the back and the third for both sleeves, we will get 7 repeats per 1 part, which corresponds to 7p.x17p. = 119 loops, and the width of the back without armholes is 39 cm, which is equal to 6 rapports of the extended circuit.
17px6p=102p. Let's check again: (39cm x127st.): 50cm = 99st.
Therefore, we will separate 6 repeats on the back, 3 repeats on the shelves, and 4.5 repeats on the sleeves.
First, we need to lengthen the back - knit a full repeat of the pattern in height, to obtain a “sprout” - that is, so that the “front” of the model does not “ride” up, does not ride up to the neck.
On the middle 6 repeats of the yoke, which correspond to the back, we knit 4 rows of the pattern. Now we knit with the rapports obtained by expanding the yoke pattern 
According to the pattern, the width of the back with armholes is 49.5 cm or 7.5 rapport. Let's add armholes to the back on its sides. To do this, after knitting the 4th row of the back sprout, we knit a chain of chain stitches at the end of the row. 5 cm long, make lifting loops and perform 0.75 repeats of the pattern on the knitted chain, 6 repeats of the back pattern, on the other side of the back we similarly add the width of the 2nd armhole, also include them in the pattern and knit the entire length of the back on 7.5 repeats (0.75+6+0.75= 7.5 rap.).
Then let's start doing one, then the second shelf: 
We will tie the formed armholes. We will tie the bottom and fronts by making strips and holes for buttons on the right strip. Let's tie the neckline.
Knit blouses with knitting needles from top to bottom with a round yoke is very convenient and fast. For knitting a yoke, choose an openwork pattern that expands downward; it will effectively decorate the blouse. Blouses with this method of knitting are seamlessly knitted, without seams, they fit well, and in addition, during the knitting process, the item can be tried on and adjusted to fit the figure.
To knit the blouse, thin acrylic yarn (280m/50g) was used, 200g was used, circular knitting needles No. 2.5.
Start knitting the yoke from the neckline. The part expands towards the bottom due to increases in the pattern; in the diagram there are increases in 7, 13, 21, 31, etc. row. First, calculate the required number of loops and pattern repeats for the neckline; its diameter should be such that the head fits easily into the neckline. Pattern repeat for the yoke according to the pattern = 6 loops; for knitting from thin yarn with knitting needles No. 2.5, it was necessary to cast on 144 loops for the neck = 24 pattern repeats. Close the cast-on loops into a ring and knit in circular rows of 2 cm with a 1x1 elastic band.
Then knit an openwork pattern according to the pattern; in the 7th row, due to two yarn overs without decreases, each pattern repeat will expand by 2 stitches and the number of loops will increase to 192 loops. Knit an openwork pattern with increases in the 7th, 13th, 21st and 31st rows until the yoke from the neckline reaches the beginning of the shoulder.


Next, you should expand the yoke according to the figure, depending on your size; if expansion is not required, do not knit rows with increases so that the yoke does not fold. The length of the yoke must be knitted according to measurements from the neck to the armpit (the beginning of the armhole), and large diameter it should be equal to the circumference of the chest along with the arms.
![]()
Having knitted the yoke, proceed to knitting the bottom of the blouse in stockinette stitch. But first you need to distribute the loops on the front, back and sleeves. To do this, leave 9 repeats of the pattern on the front, 5 repeats on the sleeves and loops, 6 repeats of the pattern on the back. The number of loops for the front should be greater than for the back, this is necessary to expand the chest and a larger neckline in front.

Temporarily remove the loops for the sleeves onto an additional knitting needle or temporarily close them with a crochet hook by knitting a row of stitches through each loop from the knitting needle with an additional thread. Closed loops with a hook can be easily unraveled by pulling the end of an additional thread, this will free up the sleeve loops for work, and while they are closed, the item is easy to try on.


When knitting the bottom of the blouse in the first round row above the sleeve loops, additionally cast on the loops for the armhole. A total of about 15-20 loops, for an armhole 5-7 cm wide, depending on your size and knitting density.

Knit the blouse down in stockinette stitch from the armhole to 33 cm long and 4 cm in 1x1 rib, then bind off the stitches.

The main work is done. Now you need to knit the sleeves. To do this, unravel the crocheted row, slipping the sleeve loops onto the knitting needle. Attach the thread and when knitting the first circular row in stockinette stitch, cast on loops along the armhole. Knit the sleeve in stockinette stitch 2 cm, 1 cm in garter stitch, to do this alternate 1 circle with purl stitches and 1 circle with knit stitches, bind off the loops after 5 rows.

